Throne of the Tides It is a dungeon for players of levels 80-82 and is part of the complex of Abyssal Maw. This area is located in Vashj'ir and although there are two entrances, at the moment only one remains open.

Despite being underwater, the dungeon takes place in an underwater cave. It is a really well constructed area aesthetically and with some unique encounters, in which we will have to kill Nagas and some servants of the Old Gods.
Throne of the Tides / Throne of the Tides Entrance
Lady Naz'jar

"Salud": 1,787,160 - 3,734,730
- Level: 82 / 87
- Skills:

Fungal spores: Launches deadly mushroom spores at a random player that explode on impact within a 5 meter radius. Any player in that circle will take 10,000 points of Nature damage every 3 seconds for 15 seconds.
-
Geyser: Summons a geyser at a random player's location. After 5 seconds, the geyser erupts, dealing 23750-26250 points of Frost damage and knocking back all enemies within 5 meters.
-
Shock explosion: Strikes the target with lightning bolts, dealing between 33,250 and 36,750 / 141,375 and 158,625 Nature damage points.
-
Sprinkler: Creates a rotating vortex of water that periodically knocks down enemies within 0 yards. Additionally, the water vortex will deflect all spells cast at the caster and cause all ranged attacks to miss. Lasts 1 min.
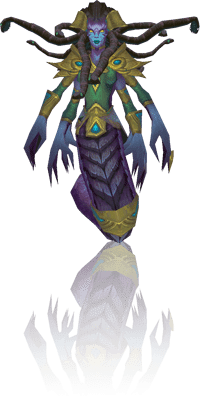
Lady Naz'jar He is the first boss of the Throne of Tides dungeon. At the beginning of the fight, the bars of the room will be closed so before starting the fight.
This naga has some pretty curious abilities. The most dangerous skill is without a doubt Shock explosion, ability that must be interrupted in all possible cases to avoid excessive damage. In addition, throughout the combat he will place a Geyser under the player who after about 5 seconds, will explode emerging a column of water and will have to move away before that happens. Lastly, Lady Naz'jar will use Mushroom Spores during combat. These are slow and clearly going towards a player so we will try to avoid them at all costs.
At 66% and 33% of his health, he will wrap himself in a Sprinkler and two Sea Tempest Witches and a Naga Honor Guard will appear. Importantly, it is possible to use any form of crowd control with them. Both witches use ranged attacks and chains of lightning, so it's a good idea to kill them before the Guard who attacks melee. This one will enrage at 30% health, although it is not too much of a problem. Lady Naz'jar will be at the Sprinkler for 1 minute or sooner, if we finish off the Nagas. These must die before it's over or we may find ourselves in trouble.
Differences in heroic mode
In heroic mode, during the time you use the Geyser, a series of water eddies appear that we will have to avoid. Besides, the Shock explosion it is totally deadly for a tank so it must be interrupted if you don't want it to die irretrievably.
Commander Ulthok / Commander Ulthok

"Salud": 1,116,975 - 4,149,700
- Level: 82 / 87
- Skills:
-
Curse of fatigue: Curse a random target. Reduces movement speed and haste by 50%. Lasts 15 seconds.
-
Dark fissureUlthok smashes the ground in front of him, dealing 56,550 to 63,450 points of Shadow damage to all enemies within 7 meters of the point of impact. Additionally, a dark rift opens at the impact location, dealing 9,425-10,575 points of Shadow damage per second to all enemies within 5 meters. These cracks last 1 minute open.
-
Infuriate: Ulthok rages, increasing all Physical damage dealt by 50% for 10 seconds.
-
Squeeze: Grab a random player and squeeze them, inflicting 5,000 / 12,500 Shadow damage per second for 6 seconds.
Right after Lady Naz'jar we will face this faceless one.
The most significant skill of this combat is Dark fissure, which will be used by Ulthok quite often. The tank and melee DPS they should avoid it moving away from him as soon as he begins to throw it since it is most likely let them die. It would be best if the tank was continually moving it around the room to avoid being hit as much as possible. Of course, no one should step on the Rift it leaves on the ground, otherwise it will take a lot of damage.
During combat, Ulthok will enrage for 10 dealing significant damage to the tank. In case the tank is "kiting" you around the room, it will avoid most of this damage. Otherwise he should use some defensive ability to make these seconds more bearable.
Healers must ensure that the health of the players remains high, otherwise, when Ulthok squeeze to a player (or himself), he could die. Also, whenever they can they should eliminate the effects of Curse of fatigue.
Differences in heroic mode
In Heroic mode, fissures grow incessantly throughout the room. In this way, positioning becomes essential as the room will progressively run out of space. In case of not doing enough damage, there will come a time when it will be impossible to continue the fight.
Erunak Stonespeaker & Dominately Ghur'sha / Erunak Stonespeaker & Mindbender Ghur'sha

"Salud": 1,787,160 - 4,979,640
- Level: 84 / 87
- Skills:
- Erunak Stonespeak Mastered:
-
Lava discharge: Launches molten lava at a random target, dealing 18,850-21,150 / 56,991 and 63,891 points of Fire damage and throws it back.
-
Fragments of land: Throw a line of spikes towards a random player. When the spikes reach their destination, they explode into a larger set of spikes, dealing 1,885-2,115 points of damage every 0.5 sec to all enemies within 5 meters.
-
Magma splash: Deals between 18,850 and 21,150 points of Fire damage in a cone in front of Erunak. Additionally, targets will take 2000 Fire damage per second for 10 seconds.
-
Ember Strike: Deals 100% weapon damage as Fire damage and afflicts the target with Ember Strike. This effect deals between 1,885 and 2,115 points of Fire damage each time the target takes melee damage. Lasts 10 seconds.
- Dominately Ghur'sha
-
Absorb magic: The Mindbender is protected within a shield that absorbs all spell damage. All damage absorbed, heals you for three times the amount absorbed. Lasts 3 / 5 seconds.
-
Enslave: Jump on the head of a random player and charms him. The victim will see increased health, damage and healing while remaining rapt. This effect lasts 30 / 60 seconds or until the victim's health drops below 50%.
-
Mental fog: Summons a 10-meter zone of fog around the Ghur'sha Mindbender. All enemies within the mist will be unable to attack or cast spells and will take between 471 and 528 Shadow damage every 0,5 seconds while inside. Lasts 20 seconds.
-
Inexorable agony: Causes all surrounding enemies to suffer excruciating pain, dealing 1,885-2,115 points of Shadow damage per second over 10 seconds.
- Erunak Stonespeak Mastered:

When we enter the room, we will see that Erunak Stonespeaker (it will sound like you if you have done the Vashj'ir missions) has an octopus on his head. This makes it hostile towards us so we are going to have to shake it to get rid of the parasite.
The tank should grab it and place it with its back to the rest of the group as its Magma splash, affecting all players in front of him, can quickly deplete party health. In addition, you will use Lava discharge y Fragments of land against the players in a random way by throwing them backwards, interrupting the casting of spells. Also, Erunak will use Ember Strike against the tank, leaving it a magical effect that must be dispelled by a healer as much as possible.
Once we have removed 50% of its health, the octopus will jump from Erunak's head, releasing him from his control. Instead of helping us finish the job, he'll kneel on the floor so let's not expect anything from him.
We will soon find out what you like Enslave to the people. He will choose a random player and he will be placed on his head. This player will increase the health he has and we will have to reduce it by 50% if we want him to get rid of him. All the damage we do to the
As long as he is not enslaving anyone, he will launch Inexorable agony affecting all players. In addition, it will place Mental fog under the. You need to get it out of there quickly so that melee DPS are not forced to stay in it.
Finally, we will have to be aware of Absorb magic Since any magic damage we do to him will heal him, considerably increasing the duration of the fight. This effect can be dispelled.
The Dominately will enslave players an average of 3 times before being defeated.
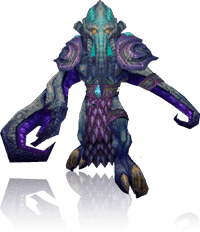
Ozumat

"Salud": ???
- Level: 84 / 87
- Time to rage: 5 minutes

Ozumat is a peculiar combat, and it is the last that we will see in this dungeon. When we enter we will see Neptulon who, despite being one of the elemental lords, is not against us and will help us in the fight against Ozumat. This is none other than the Octopus that has been circling the cavern continuously.
It is a combat clearly divided into three phases.
Phase 1
In this phase small murlocs will appear from the depths and the occasional small faceless one. They will try to attack Neptulon and neither does too much damage. DPS can easily engage them without needing help from the tank. Occasionally a Ruthless Behemoth (larger faceless) will appear that needs to be tanked and moved around the room as it has an attack with which it hits the ground doing about 25,000 points of damage.
Phase 2
The murlocs from the depths as well as the behemoth will no longer appear. Instead, Beasts and 3 Vicious Lashers will spawn. The latter will channel something on Neptulon, leaving it totally useless and inflicting damage little by little. If we take too long to kill them, not only are we getting dangerously close to the time of rage, but we could cause Neptulon to die.
This is the most complicated phase without a doubt since the Tank has to take care of moving the beasts and it is very likely that the implacable Behemoth still remains alive. The DPS should focus on taking down the Lashers (they don't need to be tanked) quickly although they should also take off some of the tank's weight that will have various Blight Beasts chasing you.
As if that weren't enough, Ozumat will appear on the scene, dedicating himself to throwing puddles of ink on the ground that we must avoid so as not to receive additional damage.
Once we finish with the Vicious Lashers, we will move on to phase 3.
Phase 3
As soon as Neptulon frees himself from his captors, he will use on the group Wave Force. Growing enormously and gaining a huge increase in health and damage dealt. This phase becomes a DPS race as Ozumat will launch Ozumat Blight all over the floor. It initially inflicts 200 points but this stacks up to 200 times, making it impossible to heal.
However, with the health benefits and damage we get, it is not difficult to reach the end of the encounter and take down Ozumat. The difficult thing is to orient oneself since our character grows a lot and we are not used to it.
Dungeon Video
[notice] In this dungeon there are achievements that can help you get a Volcanic Stone Drake. If you need a little help to make the achievements, do not hesitate to visit our Cataclysm Hero Guide. [/ notice]