
Hey good! What's up? Today we bring you a guide to the Shadow Priest for Patch 7.3.5 that will help you unleash the full potential of this specialization. Without further ado, nougat!
Shadow Priest
Priests are spiritually committed and express their unwavering faith by serving the people.
Modifications in patch 7.3.5
- There have been no changes for this specialization.
Modifications in patch 7.3.2
- There have been minor and minor changes.
-Strengths
- This spec does quite a bit of damage in both single and multi-target encounters.
- Momentarily increase movement speed thanks to one of his burst abilities.
-Weak points
- This specialization is especially slow to deal burst damage.
- He is not very healthy.
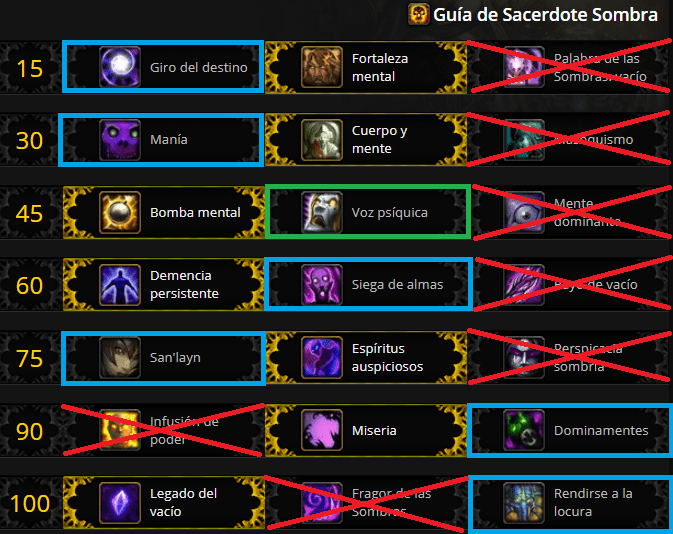
Talents
Next I will leave you several ways to face your enemies and different ways of developing the encounters, be it massive objectives or encounters with just one objective. As in the previous guide, choose the ones that you like the most or are close to your possibilities.
-Talents in yellow: they can become the best depending on which fights, in this case, they are the best for single-objective encounters.
-Talents in blue: you can choose them in case you do not like the ones that appear in yellow, there will not be much difference in the DPS.
-Talents in green: these talents are the best to do much more damage in areas, that is, encounters with more than three objectives.
- Level 15: Mental toughness.
- Level 30: Body and mind.
- Level 45: Mind Bomb.
- Level 60: Persistent Insanity.
- Level 75: Auspicious spirits.
- Level 90: Misery.
- Level 100: Legacy of the Void.
lvl 15
- destiny twist: Increases damage done by 20% and healing done by 20% for 10 sec.
- Mental strength: Mind Flay and Mind Blast deal 10% increased damage.
- words from the shadows empty: Strikes the target's mind for (220% of Spell power) damage. Shadow damage.
In this first talent branch, we will choose Mental strength before the other two options since we seek to inflict greater damage on a constant basis although we can choose destiny twist if we want to do burst damage when throwing the crafts.
lvl 30
- mania: You move 1% faster for every 3. of dementia that you have.
- Body and mind: Heals the target for (60% of Spell power). every 1 sec and increases their movement speed by 40% for 4 sec.
- masochism: When you cast Shadow Mend, its damage over time effect heals you instead of damaging you and reduces all damage you take by 10%.
In this branch of talents we can choose the one that best suits our possibilities, although, in my opinion, I would recommend using Body and mind o mania before masochism.
lvl 45
- mind bomb: Hit the target with a Mind Bomb. After 2 sec, or if the target dies, unleash a psychic blast that stuns all enemies within 8 yards of the target for 4 sec.
- psychic voice: Reduces the cooldown of Psychic Scream by 30 sec.
- dominant mind: You can also control your own character when Mind Control is active, but it now has a 2 min cooldown and cannot be used against players.
mind bomb It can be a good option if we are in a room with more people in the same group. If we have a tank and there are a large number of objectives, it is the best option while, if we are alone, psychic voice it can save us from compromising situations. After all, this branch also depends a bit on your "modus operandis."
lvl 60
- persistent dementia: When Voidform ends, its haste is decreased by 2% per second, instead of canceling out immediately.
- reaping of souls: Shadow Word: Death can now also be cast on targets below 35% health and always generates Insanity as if it had killed the target.
- ray of emptiness: Each time your Mind Spike, Mind Flay, or Mind Sear deals damage, you take 10% increased damage from Mind Spike, Mind Flay, and Mind Sear for 6 sec. Stacks up to 4 times.
reaping of souls It is a great talent that we can choose in encounters with just one target since we can get a lot more damage in the final part of it. This talent can be carried along with surrender to madness to keep the shape of the vacuum for a longer time.
persistent dementia It is the one I personally use most often since haste you lose slowly rather than instantly, a short time slot to deal more damage.
lvl 75
- sanalyan: Increases the damage of your Vampiric Touch by 20% and the healing of your Vampiric Embrace by 20%.
- auspicious spirits: Your Shadowy Apparitions now deal 100% increased damage and generate 3. dementia.
- dark persispitica: Shadow Word: Pain's periodic damage has a 10% chance to reset the remaining cooldown on Mind Blast and cause your next Mind Blast to be instantaneous.
In this branch of talents I would choose auspicious spirits if we are in encounters of several objectives while, sanalyan, is usually used in other types of combat. Both talents are viable depending on your bosses. I would choose without a doubt auspicious spirits since I generate dementia.
lvl 90
- infusion of power: Infuses you with power for 20 sec, increasing Haste by 25% Shadow Priest and increasing Insanity generation by 25% and reducing the mana cost of all spells by 25%.
- misery: Vampiric touch also applies to the target Shadow Word: pain.
- you dominate: Summons a Mindbender that attacks the target for 12 sec. You regenerate 0.50% of maximum mana each time the Mindbender attacks.
This can be one of the most useless branches to the naked eye, and yet it can be reflected in the DPS you do. misery lets you not have to waste a second of global cooldown to cast Shadow word: pain and it is the one that, in my opinion, is the best option when it comes to carrying out our main rotation.
you dominate Many people use it but I don't consider it as viable. Maybe for people who run out of mana fairly quickly, it can be a good talent.
lvl 100
- legacy of the void: Void Eruption can be cast as long as your Insanity level is 65. or higher and Voidform increases Shadow damage dealt by an additional 5%.
- roar of shadows: Hurls a slow blast of Shadow energy at the target point, dealing (800% of Spell power) damage. Shadow damage to all targets within 8 yards. Generates 20 p. dementia.
- surrender to madness: All of your Insanity generating abilities generate 100% more, and you can cast them on the move until you are no longer in Void Form. Then you die. In a horrible way.
And finally, in this last branch of talents we will choose legacy of the void since it powers our main burst.
The reason I have not placed roar of shadows as possible talent to perform areas is nothing more and nothing less because it is a useless talent. Apart from the fact that the ability takes time to reach its destination, in encounters with up to three targets, it is a useless ability.
surrender to madness It is a talent that, although it manages to make me smile every time I read the description and my mind imagines it, it can become the best option if we have enough speed to stay in this shape for as long as possible. If you are already "cheto", use this, your damage will exceed Sargeras himself or even a turtle with nunchucks. This talent can be carried along with reaping of souls to keep the shape of the vacuum for a longer time.
Artefact
Before attaching the image that will help you to make the best paths in your artifact weapon, I must warn you that at level 110 you will directly unlock Artifact Knowledge at level 41, obtaining an artifact point multiplier of 5.200.000 %. Perhaps it is best to wait at maximum level to worry about the roads and not waste a lot of time in this regard.

Secondary statistics
Haste> Critical Strike> Mastery> Versatility
The purpose that this specialization should first take haste is mainly due to one of its abilities, crafts. Damage dealt increases based on the percentage of haste we are currently carrying.
Enchantments
- Warsong Mark: Permanently enchant a necklace to increase Haste and Critical Strike by 1000 for 6 seconds.
- Offering of Haste: Permanently enchant a cloak to increase Intellect by 200.
- Offering of Haste: Permanently enchant a ring to increase by 200. haste.
Gems
- Taladita of Immaculate Haste: +200 intellect.
- drill: +200 Haste.
Flasks and potions
Practical tips
- With this Priest specialization, our priority is to get as fast as possible to deal more damage.
- We must bear in mind that we will not perform burst damage until after a few seconds in combat, since we will have to enter our crafts.
- Once we have the full power bar, we must use crafts and launch our most powerful abilities to stay in this shape for as long as possible. Upon losing all power, we will return to our original form.
- During the transformation, we will have active a that we will have to use every time we have it ready. It is a snapshot and it will not take up much time in addition to being a very useful ability since it will generate Dementia (power of the shadows).
- We must keep d y e active on the objective we are facing.
- Launch e as long as it is active.
- At the end of the rotation, we will finish with f until you have the other abilities active or have to recharge the damage marks.
BIS team
- We have fixed a bug in the table. The objects will now be displayed correctly:
| Helmet | Golden Seraph Crown | aggram |
| Pendant | 9 | Argus the Unmaker |
| Shoulder pads | 8 | Noura, Mother of the Flames |
| Cover | Golden Seraph Shawl | Admiral Svirax |
| Front | 7 | Essence of Eonar |
| Bracers | Veridian Fireweaver Wives | Antorus Global Loot |
| Gloves | Golden Seraph Handwraps | Kin'garoth |
| Belt | 2 | Legendary |
| Trousers | 6 | asd |
| Boots | Lady Dacidion's Silk Slippers | Gatekeeper Hasabel |
| Ring 1 | 1 | Legendary |
| Ring 2 | 12 | Noura, Mother of the Flames |
| Trinket 1 | vision-future-of-velen | Kin'garoth |
| Trinket 2 | d | Argus the Unmaker |
| Blood Groove | Seed of creation | Garothi Worldbreaker |
| Shadow Slots | 1Seed of Creation y 1 | Argus the Unmaker y 1 |
Useful addons
ElvUI: Addon that modifies your entire interface according to practically everything you want to see.
Bartender4/dominos: Addon to customize action bars, add keyboard shortcuts, etc.
MikScrollingBattleText: Floating text addon of combat, healing, skill damage, etc.
deadlybossmods: Addon that alerts us to the abilities of the gang leaders.
Recount/Skada Damage Meter: Addon to measure dps, agro generated, deaths, healings, damage received, etc.
Grid/Healthbot Continued: Addon to view the entire raid in a window and create shortcuts for healings.
EpicMusicPlayer: Addon to listen to personalized music. It is always good to listen to Judas Priest or Type O Negative while you crunch Kil'Jaeden 😉
Hola!
In my opinion, this guide lacks deep personal knowledge about the class. The rotation explanation is pretty sketchy for what it takes to know how to use a Shadow Priest well. For the record, I am not here to make a destructive comment, quite the opposite.
For example, the talents you explain: Twist of Fate is, without a doubt, the talent that gives us the most dps in all kinds of encounters. Forever. Mental toughness is hardly used, and if it is used, it would be very punctually. Misery is only used in mythic +, in raid, and more looking at the bosses of Antorus, the only encounter he is good at is the Guard of Eonar. In the rest, you always dominate. I am not making this statement that strong because it is what I think is better, it is that there is no more to try it or see logs. Infusion of power now does not stand out so much, but from there to cross it out because it is useless ... I do not agree at all. As for the legacy of the void and surrender to madness, even though we have good haste and excellent equipment and know how to use the cool class, we are going to get legacy of the void in advance raid situations. Surrendering to madness is best when encounters get shorter. Right now, in many bosses in normal it is convenient to take Surrender to madness, but in heroic it is not. And it is for the duration of the combat generally. Another thing you don't indicate is that some talents go "in pairs." When we carry Surrender to Madness, Soul Harvest is also carried, which is what allows us to maintain that last form of the void for longer.
All the best
Good Morning! How's everything going? It is true that I have not used the specialization in such depth to make it completely solid but I will take a look at it to complete the guide as soon as possible as I have been convinced by some of your arguments. There are some talents that I consider useless due to the usefulness that can be given to them but I can't tell you what usefulness it can have in each specific boss, in this guide I focus on explaining the specialization as I consider that it can be carried with greater potential and really I'm not digging so deep as to indicate which talents are better depending on the match, I mean, I explain it from a general point of view. Another thing I want to tell you is that I have already made other guides in which I cross out talents for being "useless" in meetings in general, but when I had to talk about which talent was better, I mentioned that the one I had crossed out was useful according to what things. See the Beast Hunter guide. I will not make big changes but, without a doubt, I will explain in depth what you have named me about couples since it is a mistake not to take it into account. Without further ado, I really appreciate your comment and I hope you continue to provide corrections. A hug! (> ^. ^)> <(^. ^ <)