Aloha! Anezalis-ColinasPardas of the Brotherhood Call of Cthulhu will discuss the operation, abilities and talents of the Destruction Warlock in Patch 8.1. It is a guide focused on PvE, both mythical + and the current raid.
Destruction Warlock
In the face of demonic power, most heroes see death. Sorcerers see only opportunity. Domination is their goal and they have found a way to it in the dark arts. These voracious wizards summon demonic minions to fight alongside them. At first, they only control the Imps, but as the warlock's knowledge broadens, seductive Succubi, Loyal Abyssal, and fearsome Felhunters join the ranks of the Dark Sorcerers to wreak havoc against anyone who stands in the way of his master.
Modifications in patch 8.1
General class changes:
- Demonic Embrace: 10% increased Stamina
Destruction Specialty Changes:
- Smoke Blast now has a maximum of two charges.
- Rain of Fire: Now has a wider range, 40m instead of 35m.
- Summon Hellish will deal less damage every two seconds, 84% of the damage it did previously
Skills
Main damage abilities:
- Immolate: our main effect of damage over time. Spawns Soul Shard Chunks. We must keep it applied in all objectives. It is important to refresh the Immolate when there is less than 30% of its duration (5,4 seconds)
- Incinerate- Our main fill skill, generator of Soul Shard Chunks.
- Conflagrate- Instant ability that generates half a soul fragment.
- Chaos Bolt: our main damage ability and in which we will spend the generated soul fragments.
- Fire rain- Area damage skill with a high consumption of soul fragments, so it will be worth using it from 5 targets.
- Drain life: channeled that we will use only in emergency cases when we have to heal.
Other useful skills:
- Demonic portal: it grants us mobility from one point to another both to us and to our bandmates or group.
- Create Soul Well- Grants health stones to all party or raid mates. These health stones can be used once in combat and do not share a cooldown with health potions.
- Soul stone: resurrection in combat.
- Fear: control ability, the target is disoriented for 20 seconds.
- Banish- Banishes a demon, elemental, or aberration for 30 seconds, preventing it from doing anything.
- Shadow fury: area stun with 1 minute CD (can be reduced by a talent)
- Enslave demon- Enslave an enemy demon to become your pet for 1 minute.
Offensive cooldowns:
- Summon infernal: Summons an Infernal that stuns in an area at the moment of its cast and deals damage in area for 30 seconds. In addition, it grants us a Soul Shard Chunk every 0.5 seconds, so our Soul Shards will replenish at high speed while our Infernal is active.
- Havoc: ability that replicates in a second target the abilities we throw at our main target with 60% of their damage. In addition to replicating this damage, it also doubles the generation of resources (that is, an ability that gives us a piece of soul fragment, when hitting two targets, it happens to give us two pieces).
Defensive cooldowns:
- Endless resolution: reduces all damage taken by 40% and prevents us from being silenced or stunned for the duration.
Resource: Soul Shards
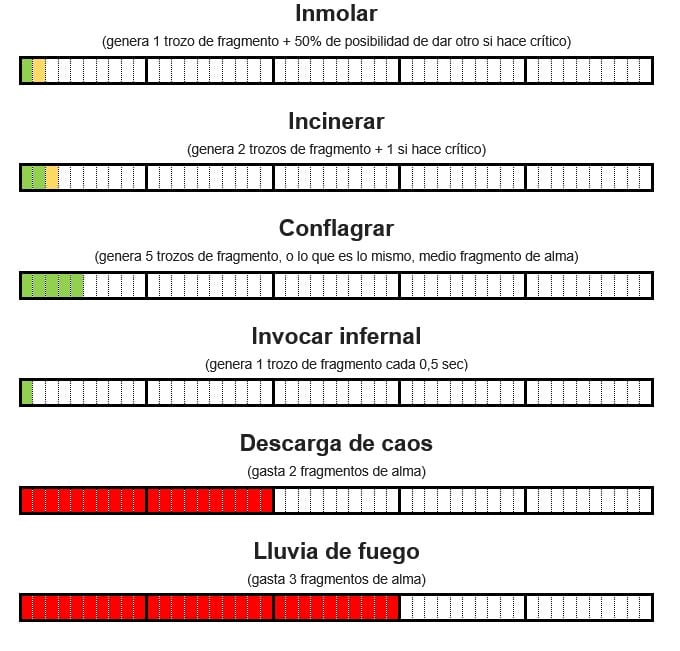
- Our main resource will be the soul fragments. We will have five, which in turn are made up of 10 Soul Shard Pieces each. We have a series of abilities that recharge us with this resource (Immolate, incinerate, conflagrate, invoke infernal) and others that make use of it (discharge of chaos and rain of fire)
Pets
- Felon: Although we will lose some damage with this pet, as it attacks melee and suffers with the change of objective, it gives us a couple of quite useful skills, so I recommend taking it in bosses where it is necessary to interrupt some casting and in mythical +:
- Spell Lock: interruption.
- Devour magic: Remove a beneficial magic effect from an enemy.
- Imp: It will be our main choice in most cases, as it gives us a 5% stamina buff and is the one that suffers the least with objective changes. It also gives us a magic skill set that can be quite useful and save the healers some work:
- Abyssal: very useful for leveling up or doing missions, since it acts as a tank. It is also the pet that produces the most damage in area, so it can be useful in some dungeon pulls (as long as we don't have to interrupt, because in that case we will take the felhunter). In these cases, do not forget to deactivate the taunt of it.
- Succubus: It gives us similar damage but its abilities are not as useful for PvE as those of the other pets.
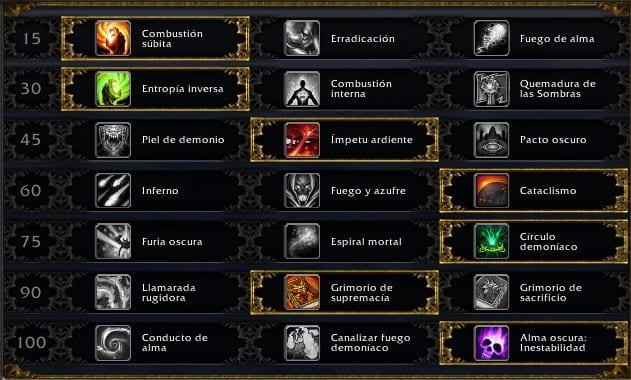
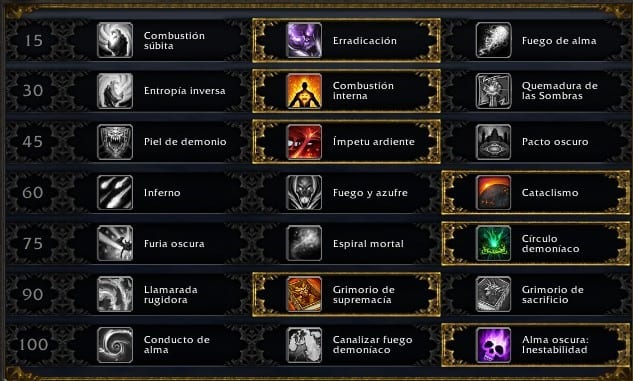
Talents
Next, I will detail what talents I find convenient to have in our build and the explanation of all the available talents.
Unlike the previous expansion, in this patch we have little versatility when it comes to designing our build. In most encounters, the same talents are usually brought in, without leaving too much room for personal choice in case you want to do as much damage as possible. In general terms, we could highlight the following ways to play the destruction sorcerer:
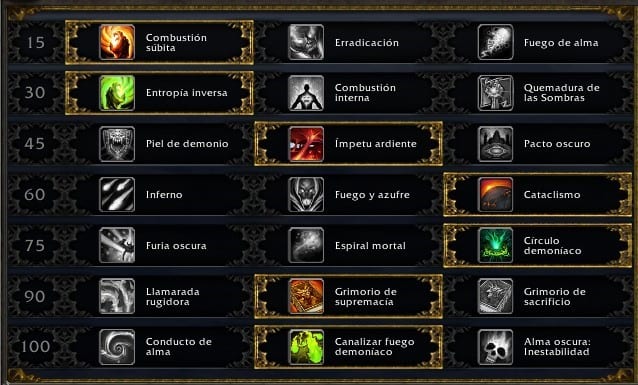
Level One
- Sudden combustion- Conflagrate deals 25% more damage and grants an extra charge of Smoke Blast.
- Eradication: Chaos Bolt increases the damage you deal to the target by 10% for 7 sec.
- Soul fire: Burns the enemy's soul, dealing (100% of Spell power). Fire damage. The cooldown is reduced by 2 seconds for each Soul Shard spent. Spawn 4 Soul Shard Pieces.
In single-target and area-damage encounters, it stands out Sudden combustion. In addition to the damage it brings us, it also gives us some mobility, having an extra charge of an instant ability that we can take advantage of in those moments.
Eradication It can also be used, although it provides less damage on a single target, being quite good for two-target combat. If we choose Eradication we must take into account the synergy it has with combustion% C3% B3n-internal (level 30 talent).
Soul fire not very viable for PvE at the moment.
Level One
- Reverse entropy: Your spells have a chance to grant you 15% haste for 8 sec.
- Internal combustion: Chaos Bolt consumes up to 5 seconds of your Immolate's damage-over-time effect on the target, dealing that amount of damage instantly.
- Shadow burn: Hits a target for (60% of Spell power). Shadowflame damage. If the target dies within 5 sec and brings experience or honor, Shadow Burn's cooldown is reset. Spawn 3 Soul Shard Fragments.
In both single target and area damage encounters, Reverse entropy is for the moment the best option.
For two-goal battles, if you have chosen Eradication, the best thing is that you choose in this row Internal combustion. Be careful because in this case you will have to refresh Immolate much more frequently. Internal combustion, even so, it provides damage quite similar to Reverse entropy in single target encounters, so the choice is yours.
Shadow burn At the moment it does not give the same results in PvE, although it is a talent that provides a lot of mobility and could be taken into account at certain times.
Level One
- Demon skin: Your Soul Parasite absorb now passively recharges at a rate of 0.5% of maximum health every 1 sec and can absorb up to 15% of maximum health.
- Burning momentum: Increases your movement speed by 50%, but also deals 4% of your maximum health every 1 sec. Movement reduction effects cannot drop your movement speed below 100% of normal movement speed. Lasts until canceled.
- Dark pact: Sacrifice 20% of your current health to grant you a shield with 250% of sacrificed health for 20 sec. It can be used while under the effects of loss of control.
In this row you can choose any of the three. I usually recommend Burning momentum, which gives us an extra mobility, although in encounters where we need a little more survival it will be more useful Demon skin.
Level One
- Inferno: Rain of Fire damage has a 20% chance to spawn a Soul Shard Chunk.
- Fire and brimstoneIncinerate now also hits all enemies near your target, dealing 40% damage and generating 1 Soul Shard Chunk for each additional enemy hit.
- Cataclismo: Summons a cataclysm at the target location that deals (180% of Spell power) p. Shadowflame damage to all enemies within 8 yards and immolate them.
Cataclismo It is the best choice in all types of encounters, whether it is one, two, multiple targets or encounters with waves of adds. As is the destruction sorcerer right now, Fire and brimstone e InfernoDespite their design, they do not provide enough damage in area.
Level One
- Dark fury: Reduces the cooldown of Shadow Fury by 15 sec.
- Deadly spiral: Terrifies a fleeing enemy target and incapacitates them for 3 sec. Heals you for 20% of maximum health.
- Demonic circle: Summons a demonic circle for 15 min. Cast Demonic Circle - Teleport to teleport to its location and remove all movement slowing effects.
In this row you can choose the one you like the most, or the one that you are most comfortable playing with. I usually recommend Demonic circle for raid encounters, due to the mobility it gives us, being able to change position without losing too much DPS. For mythical + I like more
Dark fury, as it allows us to control the pulls with a reduced CD of Fury of the Shadows.
Deadly spiral However, I find it very useful in encounters in which we need a survival bonus, as it cures us 20%. I will specify these details a bit more in the specific tips for the current raid.
Level One
- Roaring flare: Conflagrate causes the target to burn for (48% of Spell power). additional Fire damage over 6 sec.
- Grimoire of Supremacy: While you have an Inferno active, each Soul Shard you spend increases the damage of your Chaos Bolt by 8%.
- Grimoire of Sacrifice: Sacrifice your demon pet for power, gaining its Demon Mastery ability. Additionally, it causes your spells to also sometimes deal (35% of Spell power) p. extra Shadow damage. Lasts 1 hour or until you summon a demon pet.
In this row, the best choice in most raid encounters will be Grimoire of Supremacy, since it is what gives us the most damage in all cases (one, several targets or waves of adds).
Roaring flare It can be a good choice in mythical and mythical + if we are going to throw the infernal to clean pulls. In case of using it in the bosses, it is best to also choose Grimoire of Supremacy.
Grimoire of Sacrifice it is usually the weakest talent.
Level One
- Soul conduit: Each Soul Shard you spend has a 15% chance to be restored.
- Channel Demon Fire: Fires 15 bolts of fel fire over 3 sec at random enemies affected by your Immolate within 40 yards. Each bolt deals (16% of Spell power). Fire damage to the target and (7% of Spell power). Fire damage to nearby enemies.
- Dark Soul: Instability: Infuse unstable power into your soul, increasing your critical strike chance by 30% for 20 sec.
Dark Soul: Instability it will be the best option in encounters with one or more objectives. The best thing to do is to match it with our Infernal and our bead CD.
Channel Demon Fire It gives us a slightly lower but very close damage, so we can choose it in any of the cases (one, several objectives or waves of adds) if we like it more or feel more comfortable. In bosses with waves of adds, he tends to stand out more than in pure single-target bosses. In the case of mythical and mythical + I recommend this talent for the great damage that it will bring us together with Cataclismo to end the pulls.
When choosing between these two talents, you also have to take into account the time it takes to kill the boss.
Soul conduit I do not recommend it in any case because it gives us less damage compared to the other two.
Rotation and priorities
An objective
1. We precast the potion and Incinerate (when 2 seconds to pull)
2. We use Cataclismo to apply Immolate.
3. We use the Infernal
4. We use the beads of use that we have
5. We use the sequence Conflagrate - Chaos Bolt - Incinerate as many times as we can.
6. We use Dark Soul: Instability (if we carry this talent) 10 seconds after the use of the Inferno (when it still has 20 seconds left)
7. We will use Incinerate y Conflagrate to recharge our soul shards, taking into account the passive ability Smoke explosion, which reduces the cooldown of our next Conflagrate o Chaos Bolt (powered by talent Sudden Combustion)
Do not forget:
• Use Cataclismo to CD.
• Keep Immolate always on all targets.
• Use Channel Demon Fire to CD if you carry this talent.
• Do not accumulate more than 5 soul shards.
• Spend a load of Conflagrate when you have them to the maximum to be generating another one.
More than one goal
1. We precast the potion and Incinerate (when 2 seconds to pull)
2. We use Cataclismo to apply Immolate to all possible targets. If there are any left, we will apply Immolate manually.
3. We use the Infernal
4. We use the beads of use that we have
6. Conflagrate
4. We use Dark Soul: Instability (if we carry this talent)
7. We apply Havoc to our secondary objective
8. Chaos Bolt all the times we can
9. Conflagrate
10. Chaos Bolt (again as many as we can)
11. While Havoc is not active, we will recharge our soul shards with Incinerate y Conflagrate. If we reach the maximum number of fragments we can throw one Chaos Bolt so as not to waste them, but we will always try to have the bar almost full before applying again Havoc.
Secondary statistics
• Operational: Increases our spell casting speed and the number of ticks of our damage over time effects. The ideal is to bring at least 15%.
• Mastery: Chaotic Energies. Increases the damage of your spells by 50% of your Mastery. Additionally, you deal bonus damage of up to 50% of your Mastery. It also causes us to reduce the damage taken by a small percentage.
• Critical hit: increases our chance of doing extra damage. In the case of the Chaos Volley, which always deals a critical hit, its damage will increase in proportion to the amount of critical hit we have.
• Versatility: increases our damage according to the percentage of versatility we have.
The stats in the case of the Destruction Warlock are pretty balanced. With the weight of the intellect, in most cases a piece with higher ilvl (except for the rings) will be better for us.
In any case, it is always advisable to do a simulation of our character to see if the piece improves us. For this we can use tools such as raidbots.
BIS team
This BIS list is very indicative. I have made it thinking about the loot that we can obtain in the current raid, but if we also do mythical + and other types of activities that provide us with good equipment, possibly our priority when choosing one piece or another is altered. In these cases, the best thing will always be to carry out a simulation of our character to know which piece suits us at all times.
| Arma | Phoenix Fire Staff | Jadefire Masters |
| Helmet | Prowling Hood | Jadefire Masters |
| Shoulder pads | Gigacharged Shoulderpads | Greater Mekkatorque Handyman |
| Cover | Shroud of Exultant Loa | Conclave of the Chosen |
| Front | Raiment of Divine Fury | Champions of light |
| Bracers | Lever Stabilizing Wrist Covers | Greater Mekkatorque Handyman |
| Gloves | Manceroy's Fiery Fists | Jadefire Masters |
| Belt | Flowy silk girdle | Opulence |
| Trousers | Wavecaller Leggings | Storm blocking |
| Boots | Light Feather Booties | Conclave of the Chosen |
| Ring 1 | Seal of the Zandalari Empire | King Rastakhan |
| Ring 2 | Seal of the Lady Admiral | Lady Jaina Valiant |
| 1 * Bead | Incandescent Shard | Opulence |
| 2 * Bead | Crest of Pa'aku | Conclave of the Chosen |
About the beadsAlthough the two shown in the table are the two BIS in Battle for Dazar'Alor, it is fair to say that Incandescent Shard is one of the best trinkets we can carry overall. However, Crest of Pa'aku, although he is the second best in this raid, is not a big deal regarding the trinkets that we can find outside. So if you can and you like the mythical ones + I recommend that you go for:
- Ignition Mage's Wick (Tol Dagor)
- Rotten Bark Voodoo Doll (Rotten Catacombs)
- Lady Waycrest's Music Box (Waycrest Mansion)
Many of the best trinkets fall by drop of rares, world missions or world bosses, but due to the difficulty of obtaining them at a good level I have preferred to include in the list those that are more feasible to obtain. If you have been lucky and have in your power the Scorched Plumage of Azurethos (Azurethos, world boss) is also a good option. You can see the simulation of bloodmallet beads, website that I recommend for its reliability and update frequency.
Regarding the weapon, although in general our BIS will be the staff of the Jadefire Masters, in combat against Lady Jaina Valiente it is best to carry Mists, light of the sea, a left-hand object that this same boss lets go of.
Enchantments
- Arma: Enchant Weapon - Quick Navigation o Enchant Weapon - Master Navigation.
- Rings: Enchant Ring - Pact of Haste (+37 p.) Or Enchant Ring - Seal of Haste (+27 points) // Enchant Ring - Pact of Mastery o Enchant Ring - Seal of Mastery.
Gems
- Kraken's Eye of Intellect (+40 p.) In one slot and the others Quick owl (+40 p.) Or Quick Golden Beryllium.
Flasks, potions, food, and augmentation runes
- Jar: Flask of Infinite Depths
- Potions: Potion of Searing Death o Battle Potion of Intellect (For one purpose this second potion suits us better).
- Meal: if we have a feast, we can get 100p. of intellect with Captain's Bountiful Feast or 75p. with Galley banquet, which will be what best suits us. In case of not having it, the food that we will choose will be Boralus blood sausage (+ 85p. Intellect), Swamp fish and chips (+70 p.) Or Raven berry tart (+52 points)
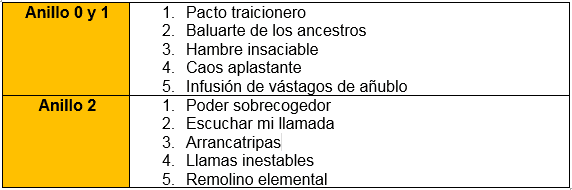
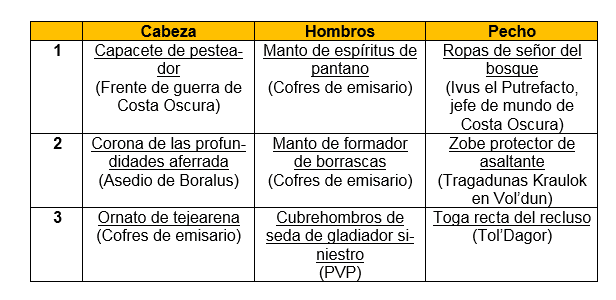
Azerite Traits
Regarding the Azerite traits that we will enhance in the head, shoulders and chest, I indicate which are the ones that will provide us the most damage based on the pieces of the BIS list shown above:
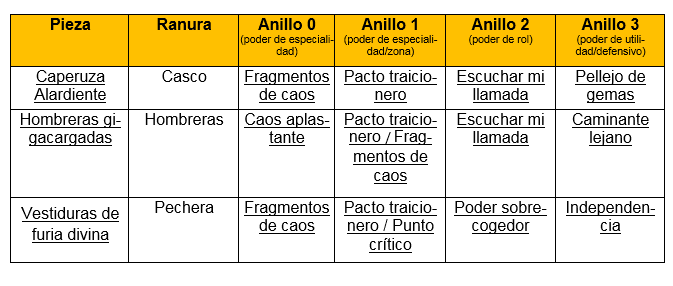
Careful! Treacherous Pact, as the name suggests, is a very dangerous trait. When your health drops below 20% you will take more damage, boosted if you carry three traits of this type at the same time. It is a trait that gives us a lot of damage, but it is not recommended to carry it in full advance. In these cases, wear other traits or other pieces (I indicate below which are the top pieces outside the band) while improving your survival.
However, as we can obtain good pieces also in mythical +, the ideal is to take into account which traits give us the most damage.
The top Azerite pieces obtainable outside of Battle of Dazar'Alor are:
Considerations 1 goal / multiple goals / cleave
The traits listed above are best for single target damage. However, within the game we can find very different situations, both when making mythical + and within the raid (we have bosses with different characteristics in this band). I always recommend keeping an eye on Bloodmallet simulations to find out what works best in each situation.
Destruction Warlock has two traits that, while they may not work well on a single target, are very good for other situations:
- Critical point: Ideal for bosses with waves of adds or mythic +, it grants us great haste each time we apply immolate to a new target.
- Multiple havoc: ideal for bosses in which we are constantly hitting two targets or with cleave damage.
My personal recommendation is that as you get extra Azerite pieces, you make gear variations for the different bosses or to switch between raid and mythic +.
Recommendations for mythical +
In mythical and mythical + we must take into account several factors to play in the best possible way.
Grimoire of Supremacy or Roaring Blaze?
In the case of standard mythical and mythical + in which we have the affix of Reinforced, it will be more interesting to have a build that allows us to finish the pulls as quickly as possible, which will be more complicated than the bosses themselves. In addition, it will be convenient on many occasions to use Infernal, our main offensive CD, in these pulls (we may even have time to throw it twice, both in the pull and in the boss, depending on the time it takes to do it). For these cases, I recommend bringing the Roaring Flare talent.
However, when we have Tyrannical, the battles against the bosses will be a bit longer than usual, and it is convenient to have an extra damage in the boss. In these cases I recommend wearing the Grimoire of Supremacy.
However, everything will depend on the companions we have on our team, how fast we can do the dungeon, and our own comfort when playing, so I recommend that you try and keep what you like the most.
Imp or Felhunter?
In general, in dungeon pulls it is very important to interrupt, so I always recommend bringing the felhunter for it. We can carry the imp in case we have a group with enough crowd control, have to dispel some skill, or go over-equipped and be able to avoid cutting certain skills. Let's not forget either that the void can be a good option for these pulls, since it is the only pet that gives us damage in area, as long as we deactivate the ability that provokes the target.
What is the best way to do area damage?
When we have a pull, what we will hit the most with will be with the combo Cataclysm + Channel Demonic Fire. We will get a great burst in area with these two abilities. However, once on CD, the question arises as to what to fill. Keep in mind that Rain of Fire has a high cost (3 Soul Fragments) for the damage it does, which is quite poor, so it will only pay to use it if we have 5 or more targets affected by it. If we have fewer targets we will hit more with Havoc and Chaos Bolt to two of them.
Other tips
• Shadow burn it is very useful to kill orbs with the affliction Explosive
• Endless resolution allows you to cast without interruption during the affix Seismic
• Dark pact allows you to reduce your maximum health in exchange for a shield, making it easier for the healer to climb above 90% with painful.
• Demonic portal allows you to skip some pulls, like the last ones from Veta Madre
• The Soul Stone It will be very useful as a resurrection in combat, but also to do the so-called “Death run”. It is about using it on the healer and committing suicide in a pull that wants to jump, so that later the healer resuscitates the whole group, wasting less time with death than performing a complicated pull.
Recommendations for Battle of Dazar'Alor
Champions of light

Azerite traits top:
- Chaos Shards, Crushing Chaos, Treacherous Pact, Critical Point
Tips:
- We could say that there are two ways to shoot this boss: "beastly" (ignoring that she accumulates damage and hitting the main boss all the time) or avoiding hitting the boss when she changes stamps. If we do it "to the beast" it will basically be a boss of a target with cleave damage to the adds through havoc, and Multiple havoc it will also be a good option.
- During the Seal of Retribution, focus on the boss, but use Cataclismo to apply Immolate to the adds. This way you will gain resources and loads of Critical point.
- Since adds cannot die during Seal of Retribution, I advise you to use Havoc in the resource recharge periods (to generate double the soul shards without doing excessive damage), and not in the spending periods (which would be when we would roll Chaos Bolts)
- During the Seal of Atonement phase, use Havoc on one add while hitting another and spend resources while they are active to maximize your damage.
- Use your pull CDs, whether you use BL pulls or if your RL saves it for the final 30%, although this will depend on how long it takes your raid to pull the boss. Possibly if you save BL for last it is because your damage is not extremely high, so it should reach you to use your CDs twice.
Grong, Lord of the Jungle / Grong the Risen

Azerite traits top:
- Crushing Chaos, Treacherous Pact
Tips:
- Place your portal staff in the center of the room, not at the ends. If it marks you with the charge, run as fast as you can (using Burning Momentum if necessary), but this way you can get back together with your teammates very quickly to avoid the fear that makes when separated from another player (in heroic or higher)
- Do not forget to use Havoc on the boss when the adds appear.
- Calculate well when to use your defenses, because your RL may recommend using them in the last tantrums, where the damage will be greater.
- Depending on the damage of your raid group you will be able to use your offensive CDs twice, pull and at 30% along with BL.
Jade firebenders

Azerite traits top:
Chaos Shards, Treacherous Pact, Multiple Havoc, Critical Point
Tips:
- Put a demonic portal for the interface in which you have to cross the room avoiding obstacles. This way you will get a corridor practically clean of traps.

- Use Havoc whenever you can but be careful not to waste them by using them when the monk disappears and you are alone with the magician.
- Try to have your offensive CDs available for when the monk is over 70% energy. Many RL decide to use the BL there, to make a DPS career and prevent it from transforming into a dragon.
- As a sorcerer you can take care of magma traps, because with the demon circle you can avoid the fall damage.
Opulence (Alliance)

Azerite traits top:
- Chaos Shards, Crushing Chaos, Treacherous Pact, Critical Point, Multiple Havoc. Actually, in this combat almost any of these traits come in handy, since once you reach Opulence it will be practically a target all the time, so we can use Crushing Chaos, but we can also benefit from the waves of adds with Point Critical or Multiple Havoc. Either option will be good.
Tips:
- Pray to all the Loa that your RL will put you in the group that will go down the left aisle. If it touches you on the right (for some strange reason, like you are all warlocks in raid) survive as you can.
- This combat does not have much to take into account, beyond taking advantage of the waves of adds to put Havoc to the boss or use defenses with the Wailing.
- Book now Cataclismo for the waves of Golden Spirits.
Conclave of the Chosen (Alliance)

Azerite traits top:
- Chaos Shards, Treacherous Pact, Critical Point. The latter is going to be our star trait for this boss, because since we are going to focus on sticking to one aspect, the other will almost always have a very high life and we can benefit from the extra speed. With the phase changes, as new two aspects will appear with 100% life, we can take advantage of it even more.
Tips:
- Even if you are going to pass one of the two aspects (because at the end of the phase it will heal completely), you can take advantage of it to generate resources, so do not forget to put Havoc to your secondary objective whenever you can.
- Always have applied Immolate On all possible targets, you will gain a lot of Critical Point charges.
- To move quickly through the sack when it comes to getting away from your teammates (with debuffs like polymorph) or looking for Pa'ku to protect us, use your portals or Burning Momentum. Also don't forget to make use of your defenses, especially with the shouts in heroic mode or higher.
- This combat is somewhat longer and it will be more difficult to match our CDs, I recommend that you use whenever you can Dark Soul, even if it does not match your Infernal. Although as I always say, the best thing will be to see how long our raid kills it and to account, since I always speak from my personal experience, but each roster is different.
King Rastakhan (Alliance)

Azerite traits top:
Tips:
- In the first phase, Immolate always on all objectives and Havoc in our secondary objective to take down the bodyguards fast.
- When we are fighting King Rastakhan, position yourself so that you also have Bwonsamdi at your fingertips. Although this is immune, it will help us to gain resources and Critical Point charges, so Havoc whenever we can.
- I recommend placing our demonic portal at the opposite end of Bwonsamdi to flee quickly from him (in the case of not having to enter the world of the dead), or at the end of Bwonsamdi to do the opposite if our RL wants us to enter The world of the dead. In any case, having it at one end will allow us to flee quickly when in the last phase the air currents push us.
- Try to have your offensive CDs available for BL use in phase 3.
Tinker Greater Mekkatorque (Horde)

Azerite traits top:
- Chaos Shards, Crushing Chaos, Treacherous Pact, Critical Point
Tips:
- It is a pure singletarget combat, but we can take advantage of the appearance of robots to gain resources.
- Try to line up your offensive CDs, as in this fight it will surely be easier for you to do so.
- Enjoy Shadow fury to stun robots if necessary.
Storm Blockade (Horde)

Azerite traits top:
- Chaos Shards, Treacherous Pact, Critical Point, Multiple Havoc
Tips:
- Do not use pull CDs, being on the ship, if you are going to use BL upon arrival at the port. Also, you may have to stop DPS if the other ship is slowing down a bit.
- Once in the port, take advantage of your portal Staff and Demon Portal to clear as much ground and flee when you have Howl of the Storm. Placing the demonic portal towards the farthest part of the boss will also help your teammates to flee after cleaning the floor.
- Always apply Immolate on adds to gain Critical Point charges, and Havoc on the boss while hitting these as a priority.
Lady Jaina Proudmoore (Horde)
Azerite traits top:
- Chaos Shards, Crushing Chaos, Treacherous Pact, Critical Point, Multiple Havoc. Almost any build with these talents is good for us, again we are faced with a quite varied combat, so all the traits have something to offer us at some point.
Tips:
- In phase 1, use Burning momentum to counteract the slow, but be careful not to drop below 80% health, as in this case your teammates will have to remove you from the ice block.
- Book now Cataclismo for the waves of sailors, and use Havoc in the same.
- Always apply Immolate to copies and adds to gain Critical Point stacks.
- In phase 2, remember to place your demon portal to help get away with the Siege Breaker Blast ability.