Guide of Yor'sahj the Watchman / Yor'sahj the Unsleeping, third boss of the Dragon Soul / Dragon Soul gang. Since the fall of the Bastion of Twilight, Yor'sahj the Watchman has aided Deathwing with great effort, providing the Destroyer with the means to free more unknown people from their subterranean prisons. Its strengths are immeasurable and its power unimaginable. Yor'sahj claims to receive a dark reward for his faithful service.

General Information
"Salud"
| Difficulty | Yor'sahj | Blood cells | Mana void | The forgotten |
|---|---|---|---|---|
| 10-man | 47M | 1.8M | 1.5M | 490 k |
| 25-man | 142M | 5.4M | 5M | 1.5M |
| LFR | 106M | 4.1M | 3.8M |
Enreage / Band composition
| Difficulty | Enrage | Band | ||
|---|---|---|---|---|
| Tank | Healers | DPS | ||
| 10-jug | No | 1 | 2-3 | 6-7 |
| 25-jug | No | 1 | 5-6 | 18-19 |
| LFR | No | 1 | 5-6 | 18-19 |
Skills

Void Discharge: Soul Hunter Yor'sahj strikes his primary target with dark energy, dealing 100000 Shadow damage and reducing healing received by 5% (10% over 25).

Call Shu'ma's Blood: Yor'sahj the Watchman summons the power of Shu'ma, which summons 3 globules of his blood of different colors. These globules slowly make their way towards Yor'sahj, granting him extra powers if they reach him.
On Heroic Difficulty, 4 globules will come to Yor'sahj's call.
-
Imbued vapors: When their health falls below 50%, the blood cells emit a searing vapor that heals the other active blood cells for 5% of their maximum health. When a blood cell dies, the remaining blood cells completely bond together and gain immunity against all forms of damage.
Globules
- Glowing globule: When a glowing globule reaches Yor'sahj, it infuses him with the glowing blood of Shu'ma.
-
Shu'ma's Resplendent BloodYor'sahj's Void Bolt now hits all nearby targets for 59000 Shadow damage in addition to the primary target component. Yor'sahj uses his abilities twice as often and his attack speed is increased by 50%.
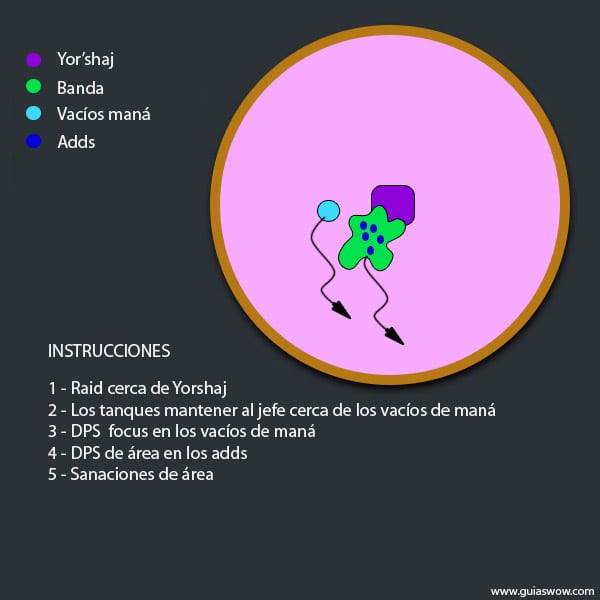
- Cobalt globule: When a Cobalt Glob hits Yor'sahj, it infuses him with the ability to summon mana voids.
-
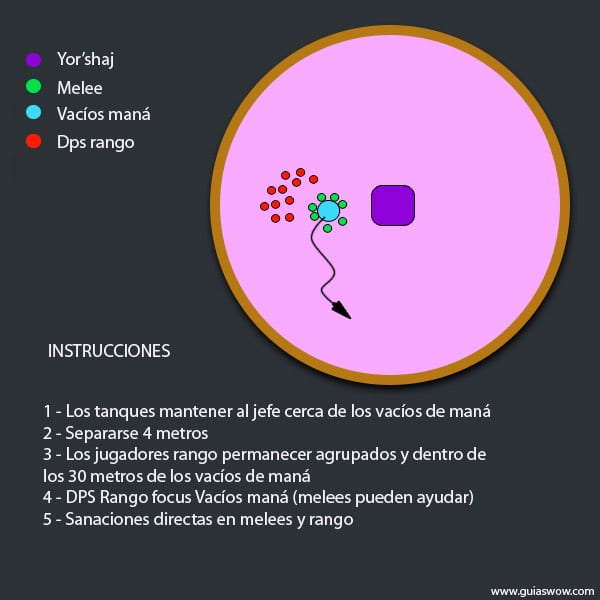
Mana void: A mana void absorbs all mana from each caster and healer and stores it within itself. Destroying the mana void returns the total mana and spreads it among players within 30 yards.
In 25 players, Yor'sahj sears the blood of 8 random players.
- Crimson globule: When a Crimson Glob hits Yor'sahj, it infuses him with the Searing Blood ability.
-
Scorching blood: Yor'sahj sears the blood of 3 random players, dealing 73000 base fire damage. The further the target is from Yor'sahj, the greater the shock it will receive from the blast.
- Dark globule: When a Dark Glob reaches Yor'sahj, blood corruption seeps into Shu'ma's jaws. Then this vile corruption periodically creates forgotten ones that attack players.
-
- Forgotten: These creatures focus on a random target.
-
Psychic Slash: The Forgotten One emits a wave of psychic force against his current target, dealing 57000 Shadow damage.
- Forgotten: These creatures focus on a random target.
- Acid globule: When an Acid Globule hits Yor'sahj, Shu'ma's jaws are infused with acid blood, stimulating the production of digestive acid.
-
Digestive acid: The stomach wall periodically secretes digestive acid, dealing 69000 Nature damage to a player and nearby allies within 4m.
- Shadowed globule: When a Shadowed Globule hits Yor'sahj, it infuses him with the Profound Corruption ability.
-
Deep corruption: Yor'sahj's Profound Corruption spreads to each player, causing the fifth heal or absorb thrown at the player to trigger a violent detonation, dealing 97000 Shadow damage to all players.
Strategy
{tab = Strategy 1}
Fight overview
The encounter with Yor'sahj is basically a single phase fight. The encounter is monotonous, in the sense that Yor'sahj only has one ability, which he casts frequently
In addition, every 75 seconds or so, Yor'sahj will summon 3 globules of different types at random (out of a total of 6 possible types). Upon reaching the boss, each globule will assist the boss, granting him a specific ability temporarily for 60 seconds. With 15 seconds left until his lead wears off, Yor'sahj will summon the next batch of globules.
The gang will only be able to kill one of the three globules at a time (when one dies the other two become immune), so the problem of the encounter is given by the choice of which globule to eliminate so that the gang faces the combination of less complicated skills.
The role of the gang leader
In this fight, the leader of the gang plays a very important role. Organize the gang to kill the right blood cell and apply the right strategy for the other two blood cells, which is where the real battle begins.
There is a lot of room for error, and we can kill the less suitable globule and still easily advance in the fight without problems as long as the strategy for the abilities of the two remaining globules is correct and properly applied.
Skills
![]()
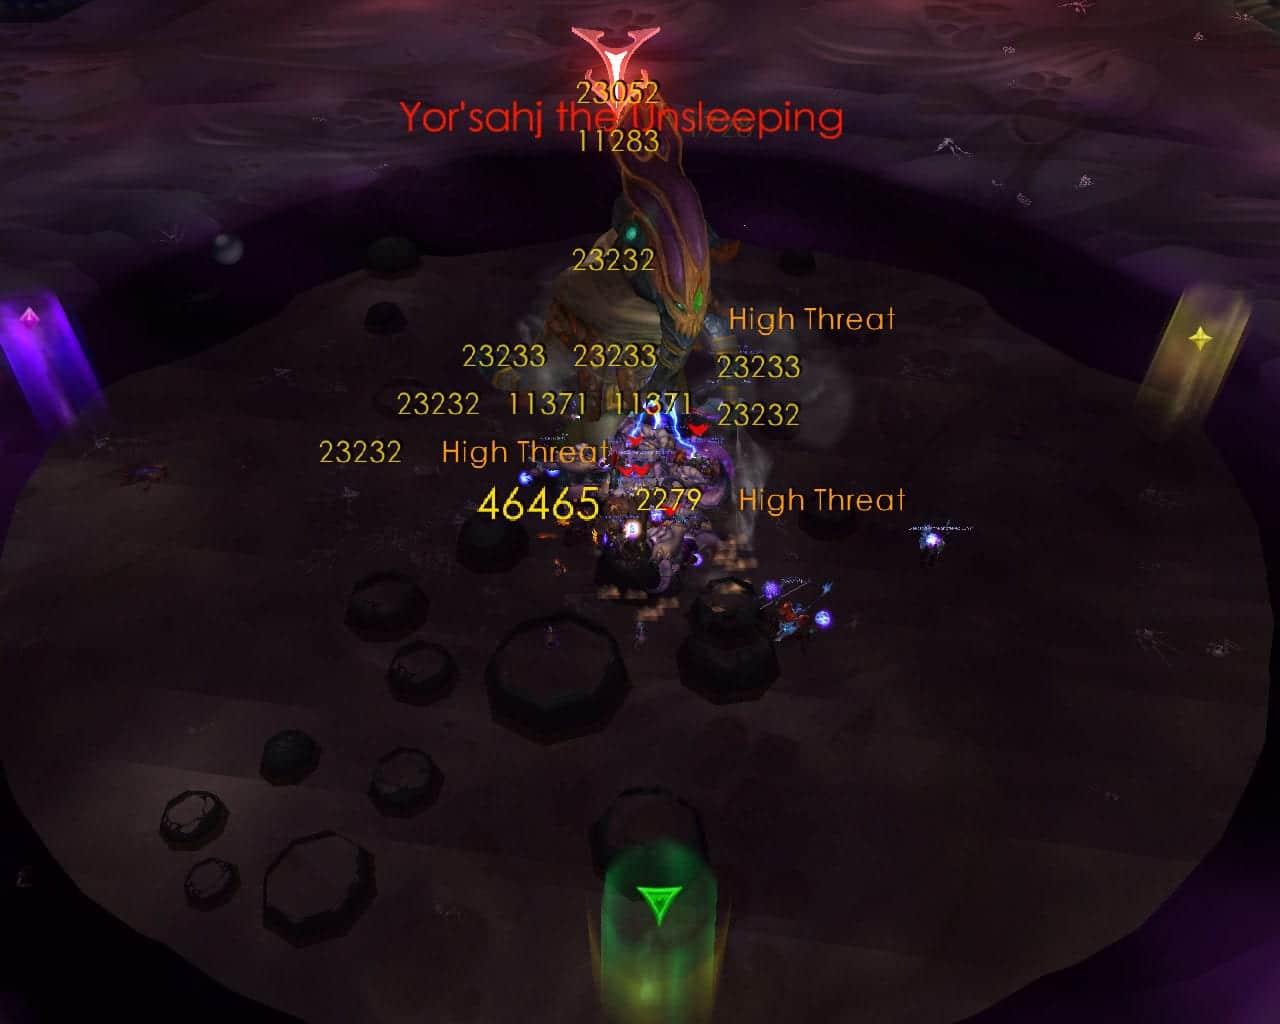
Void Discharge, is Yor'sahj's unique ability. Deals a large amount of shadow damage to the tank, plus applies a stackable debuff (DoT). He usually uses the ability with a quite unpredictable frequency (approximately every 5 seconds), however you will be able to heal tanks perfectly.
Every 2.5 seconds, Yor'sahj also deals several basic melee hits with moderate damage.
Blood cells invoked
Approximately every 75 seconds, Yor'sahj will summon three globules of different types each (of 6 different types possible) that move slowly towards him, doing nothing else. They cannot be stunned or slowed down. Upon reaching Yor'sahj, each of them grants him a different ability.
As the slugs are summoned and move towards him, Yor'sahj will remain motionless in the center of the room and will not perform any attacks or abilities, even though he can still be attacked.
Each globule has a specific name. We are going to list these names one by one but we will refer to them by their color, since this is how we will differentiate them in the game.
The gang has to kill one of the 3 globules (if it does, the other 2 will become immune to damage). This means that the gang will need to properly treat the abilities that the other 2 slugs bestow on Yor'sahj. If none of the globules are killed, the band will most likely not be able to withstand the damage it receives and consequently perish in the attempt.
Below we expose the different globules, classifying them according to the benefit they give to Yor'sahj, from the most dangerous to the least dangerous.
Purple (shadowed blood cell)
The purple globule grants Yor'sahj ![]()
Deep corruption. This ability deals a large amount of shadow damage to the entire raid (50.000p 10-jug, 55.000p 25-jug, and 35.750 with the Raid Finder) so be careful with the fifth heal or absorb that is thrown at Players.
This ability is not deadly by itself, however it tends to complicate the fight. Most gangs will rather simplify the strategy than kill the purple blood cell (accepting the damage the gang will take)
Although we do not advise having a combination of blood cells including purple, there are some cases in which you can choose to do so (see the blood cell priorities section, below)
In case we come across a combination that includes the purple blood cell, the best way to deal with Deep Corruption is to assign specific healers to heal this damage. A healer (a Holy Paladin preferably) should be assigned to heal the tank (casting only ![]()
Divine Light trying to get the tank's life as high as possible), and other specific healers should be assigned to heal the raid damage (in case the other blood cell is red or green).
Green (acid globule)
In the Raid Finder, the advantage granted by the green blood cell is considerably less, making it one of the least dangerous. In difficulty of 10 and 25 people, however, this blood cell becomes much more troublesome.
The green blood cell grants Yor'sahj the ![]()
Digestive acid. This causes Yor'shaj to occasionally damage a random player and his close allies within 4 meters of him, for a moderate amount of Nature damage (60.000 on 10 and 25 people, and 39.000 on Raid Finder). With the Raid Finder the ability will not damage nearby allies.
As with the purple globule, the buff granted by the green globule is not so deadly in its individual form, however it requires the band to be spaced across the room, the rest of the benefits require the band to be attached.
The easiest way to deal with digestive acid is for the band to spread across the room each player separating from each other about 4 meters. This is generally not the difficult thing, but it can be somewhat problematic when the green blood cell combines with another blood cell that requires the band to come together, in which case the band will need to be carefully separated within the band's location point (under the feet of the band). boss usually).
With the Raid Finder, there is no need to split up and we can just get together and heal those who take damage from digestive acid.
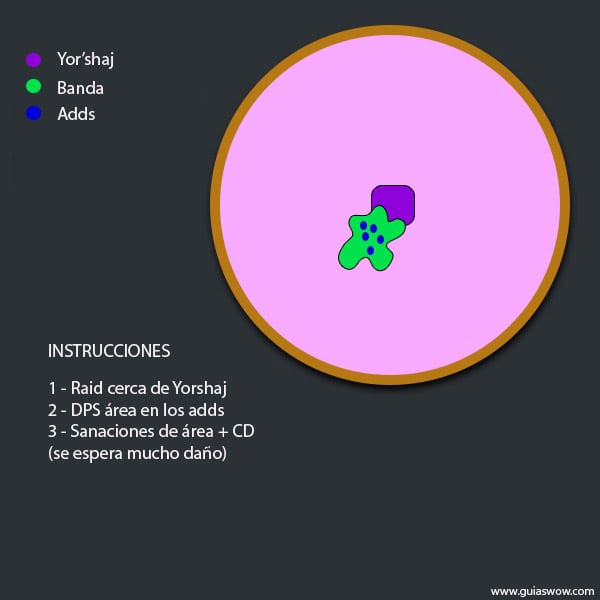
Yellow (glowing globule)
The yellow blood cell provides Yor'sahj with the ![]()
Shu'ma's Resplendent Blood. This perk causes Yor'sahj to hit 50% faster and throw ![]()
Void Discharges twice as often. Additionally, the Void bolt deals area damage that hits the entire raid (the debuff, however, still stacks only in the tank).
In this case the band will need to get together As long as Shu'ma's Burning Blood remains active (if the other blood cell is red or black), simply use area heals to lift the raid and use cooldowns to reduce damage taken.
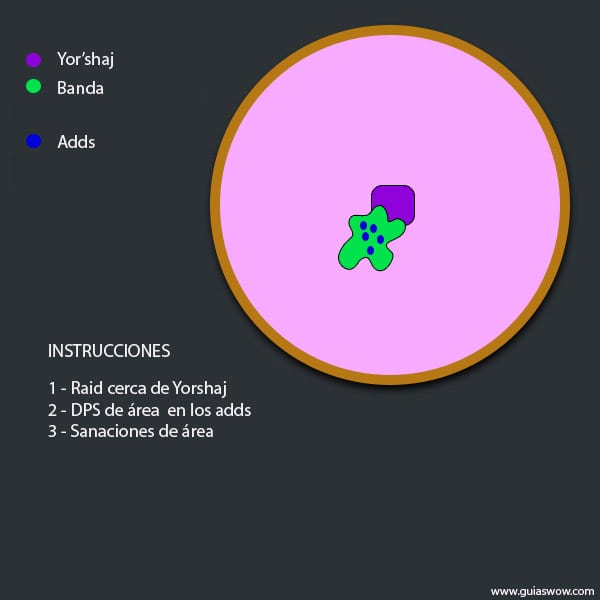
Black (dark globule)
The black blood cell causes Yor'shaj to spawn a large number of minions, called Forgotten. These minions will target a random player and regularly cast ![]()
Psychic Slash, dealing shadow damage (35.000 in 10 and 25 person mode, and 22.750 in Raid Finder).
The best way to deal with Forgotten es get together and make attacks area while healers heal in area to keep the raid high.
Red (crimson blood cell)
The red blood cell grants Yor'sahj the ability ![]()
Scorching blood. Damaging a large number of random players (3 with the Raid Finder and in 10 people, and 8 in 25 people), the damage will be greater depending on how far the player is from the boss.
Note that currently, in the test realms, Scorching Blood seems to exclusively target players who are farthest from Yor'shaj (and therefore take the most damage). We do not believe this behavior is intentional and is likely to be modified by setting it on public servers.
The best way to deal with the Scorching Blood is for everyone to stay as close to the boss as possible (practically all together at the feet of the boss). In the event that the color associated with red is green (except with the raid finder), they will have to separate 4 meters of distance between them around the boss.
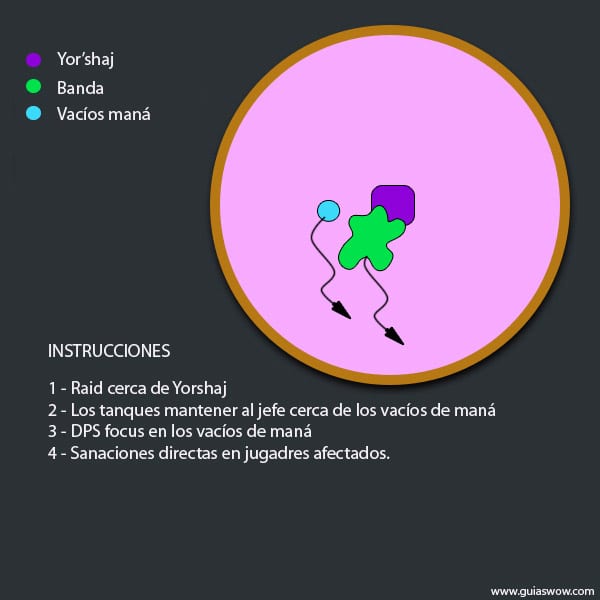
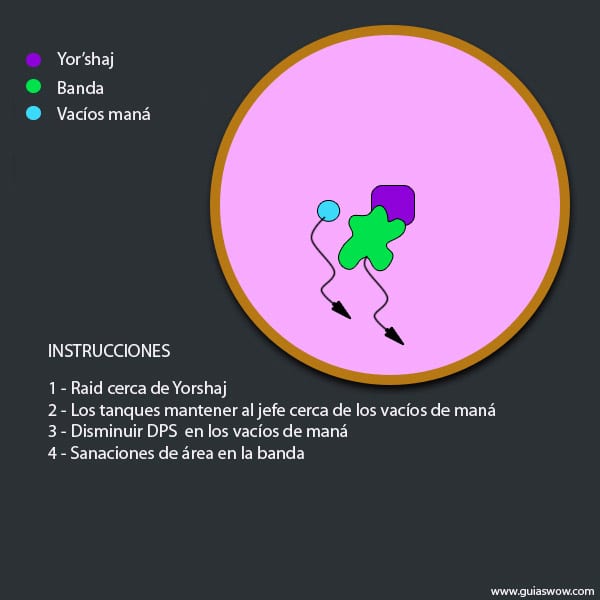
Blue (cobalt globule)
The blood cell creates a Mana Void. When this unit spawns, it drains the mana pools of all players in the raid. Since it only drains mana once, players will start to regenerate mana normally and will still be able to cast spells. When the Mana Void dies, it releases all the mana it had drained, distributing it equally among all players within 30 meters of its location (100 meters with Raid Finder).
Dealing with the Mana Void is a breeze. Enough that all DPS change their target to Mana Void as soon as it appears and kill it quickly. This will restore mana back to all players, and from then on the fight will proceed normally.
In this section, we will provide you with all the relevant information to be successful in the fight against Yor'sahj: Which globule to choose to kill and how to deal with the remaining globules.
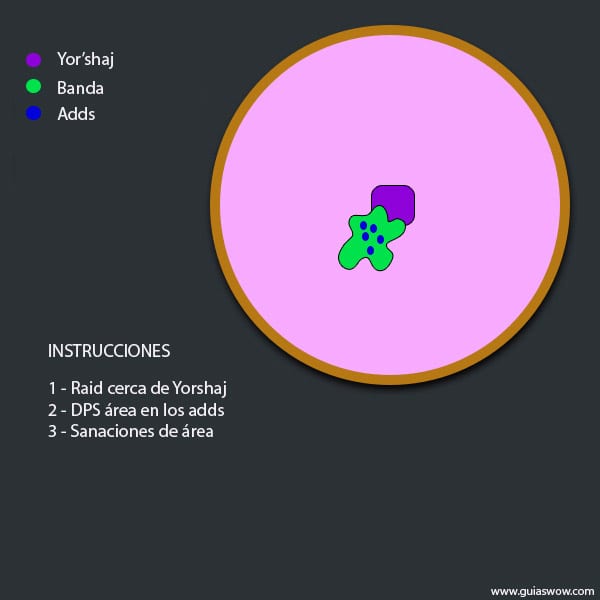
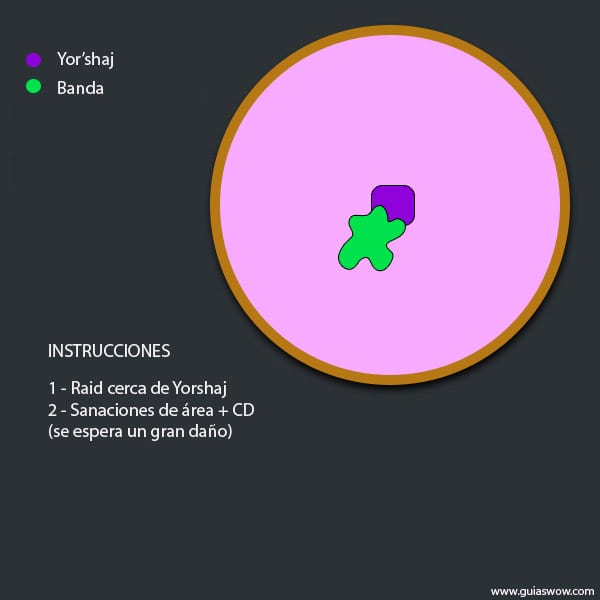
Start of the fight
When Yor'shaj is not performing any abilities provided by the globules, the encounter is basically tank and attack. Healers should only be prepared to heal tank damage (from melee hits and ![]()
Void Discharge). This initial phase only lasts 20 seconds.
The rest of the time, Yor'shaj will summon the globules and do nothing or use the abilities that the two globules give him (or three, if no globules could be killed).
Blood cell priority
Blood cell priorities to kill are as follows
- 10-p / 25-p: purple > Verde > yellow > black;
- Searcher: purple > yellow > black > Red.
The priority of killing blood cells with the finder comes from the fact that the green blood cell is practically harmless in the difficulty presented with the band finder (due to the fact that the ![]()
Digestive acid does not do area damage.
Alternatives
The priorities of blood cells to kill can vary according to the blood cells that appear to us, so we will have to kill the blood cells that will make us less trouble. However, we must appropriate the priorities of the blood cells that we will kill for two reasons:
- The decision of which blood cell to kill must be made quickly and the time is very short to be able to intervene in the different factors.
- If we comply with the priority list, the number of combinations for the remaining globules will be reduced. This means that there will be fewer strategies to learn.
That said, we want the guide to be complete and here below you can find the three combinations that the priority list will make you go through and can be more efficient. Use them as you see fit.
- purple - yellow - azul: Killing yellow instead of purple removes any damage to the raid, making it easier to deal with
- purple - yellow - Red: By killing yellow instead of purple, the damage towards the raid is greatly reduced (as long as the raid gathers on the boss), which makes it easier to deal with
- Verde - yellow - azul, on difficulty of 10 and 25 people only: By killing the yellow instead of the green, the damage towards the raid is greatly reduced and the raid can be safely separated to deal with
Digestive acid and kill the Mana Void.
How to treat blood cell combinations?
This section is not intended to be memorized. If we respect the priority of cells to kill, the strategy for handling the other two cells is easily susceptible from the abilities that Yor'sahj obtains. This section should primarily be of use to you when you are unsure about how to deal with a specific combination.
The combinations that cannot happen with our kill priorities are not detailed (basically, all combinations involve purple). The first details of combinations are the same strategies in all difficulty modes. Second, the combinations are detailed for Raid Finders, while the details in the third section are specific to the difficulties of 10 and 25 people.
Combinations of strategies for all difficulties.
| Red - yellow | black - Red | black - yellow |
|---|---|---|

|
|
|
| azul - Red | azul - yellow | black - azul |
|
|
|
Strategy Combinations for Raid Finder Mode
| Verde - Red | Verde - yellow |
|---|---|

|
|
| black - Verde | azul - Verde |
|
|
Combinations of strategies for the difficulties of 10 and 25 people
| Verde - Red | Verde - yellow |
|---|---|
|
|
|
| black - Verde | azul - Verde |
|
|
|
Where do the blood cells appear
Blood cells always appear in the same areas. There are slightly raised mounds, which are around the room, near the wall. For this reason we have the maximum time to eliminate the chosen globule, players must run to the location where the globule will appear as soon as the boss begins to launch the invocation of the new batch of globules.
Each globule is generated from a mound that is (relatively) the same color as the same globule, so it's easy to know where to go. Note that within the game the mini map is misleading in this regard, and should not be used to determine where each globule is spawned.
In order to make it more enjoyable for DPS (especially melee ones) to run to where the blood cell to be killed appears, the raid leader should set raid markers of the appropriate color near the center of the room, marking the address where the blood cells most likely to be killed are located (based on the priority table above).
How to spread 4 meters in 25 person mode
If we are faced with a combination of green and red, the gang members should be at least 4 meters apart from each other, and at the same time be as close to Yor'sahj as possible. In 10-person mode this is quite easy, but in 25-person mode it can be very problematic (especially with the little time available to set positions).
If the gang is having trouble breaking up, some pairs can simply stay together with one player on top of the other. This will reduce the total number of players who need to split up, making it a much easier situation to handle. This means that the damage caused by ![]()
Digestive acid It will hit two players instead of just one, if one of the players in pairs is the target, but this damage is much more manageable than the chaotic situation where multiple people are affected by the areas.
Using Bloodlust / Heroism
Heroism/Blood lust/Temporal distortion should be used when the raid can DPS the boss without restriction for a long time (for example, after the Mana Void has been eliminated in the cell combinations that do not contain black).
Avoiding harm
The main sources of damage in this encounter are Shadow, Nature, and Fire. The band must obtain adequate resistance improvements in order to minimize the damage received:
- Shadow resistance: Resistance aura o Shadow Protection;
- Resistance to nature: Wild look o Elemental resistance totem;
- Fire resistance: Resistance aura o Elemental resistance totem.
The match
The encounter against Yor'sahj can be mastered fairly easily, as long as the raid leader is able to reliably target the correct blood cell to kill. The most important advice we can offer your band is therefore to familiarize yourself with the proper tactics.
Once the order of killing cells has been determined, the band will only have to perform a few very simple tasks (splitting, joining, or DPS cells) that shouldn't pose any problems.
This concludes Yor'sahj the Watchman's strategy guide. We hope you have fun with this meeting so creative and different from all the others. As long as the gang leader's instructions are followed the boss shouldn't be too difficult to beat.
{tab = Strategy 2}
Since the encounter will change depending on the minions, there is no guide directly from the encounter. Instead, the band will have to know how to handle each one separately and logically generate the combinations against each other. Throughout the encounter against Yor'shaj, groups of three minions will spawn. Each of them grants you a new spell and the gang will be able to choose one to kill. There are two general categories of each plugin. The ones that make it harder to heal and the ones that increase raid damage. Blue and Purple may be the hardest to heal, while Yellow, Red, Black, Green increase raid damage. Let's talk about healing first.
Blue causes mana void. This spell drains all mana from spellcasters and healers and stores it in a minion called The Void of Mana. This minion will move freely around the boss and release all drained mana back to nearby players when eliminated. The first thing to remember is that this minion drains mana when it spawns and not over time, players can use mana reuse spells after it spawns. Things like the Mana Tide Totem, Spur, Shadowfiend, can be saved for this phase. The second phase must be remembered that the minion only returns mana to the players who are close to him when he dies. So make sure the casters and healers are close by when you kill him. With all of this, it shouldn't be too difficult.
Purple affects healers in another way. Players will receive the Profound Corruption buff during this phase. Any direct healing spell received accumulates this benefit. When it reaches 5 it detonates causing a large amount of damage to all nearby players. This means that once a player has received 4 heals, they cannot be healed again until they are gone. This takes about 20 seconds. To make this easier, we assign a healer for each group in the band. One healer is in charge of group 1, one for group 2, and so on. One thing to keep in mind is that area cures put the effect on everyone it heals. Keep this in mind during this phase.
The rest of the minions will cause the raid to take more damage. The important difference between them is the positioning of the band. Red will deal most of the damage to players furthest from the boss so everyone should position themselves on their upper side. Green will cause damage to players to increase, so everyone should be evenly distributed. Black spawns minions so he has to drop to areas. Yellow reduces the cooldown on the rest of his spells, including those obtained by Red and Green minions. The positioning of the different phases is more important than what actually happens in them and it is important that the band understand their positioning in the intermediate phase. For example, having red and black together is good, because they both require your band to have them. On the other hand, having red and green together is almost impossible because green requires consumption while red needs to be maintained. Red and blue can also be difficult as the distance will be more difficult to maintain when the mana void dies if you have to stay alongside the boss at the same time. Green and blue are similar in that the raid must remain extended for green, but it must come together when the mana void dies. Also note that green or red will do much more damage to the raid. This must be a big problem, as if you have the color yellow and green or yellow and red. the attack is not blue or purple in color and is easier to heal.
Kill order: Purple, Verde, Yellow
| Purple | Shadowed globule | Healing a player (directly) will be the end of the fight. (DO NOT HEAL) | ||
| Verde | Acid globule | Damages based on the proximity of the players. (Break away) | ||
| Yellow | Glowing globule | Massive area damage. (Area Heal / Stacks) | ||
| RED | Crimson globule | Damage based on how far you are from the boss. (Approaching the boss / He accumulates) | ||
| BLUE | Cobalt globule | Summon Mana void. Absorb manna. (kill fast) | ||
| Black | Dark globule | Summons many Forgotten. They use Psychic strength on random players. (AoE adds) |
There are 6 possible combinations:
| BLUE, Purple, Yellow | Eliminate Purple, nuke Mana void, AOE healing |
| Purple, Verde, BLUE | Eliminate Purple, nuke Mana void, Break away |
| Purple, RED, Black | Eliminate Purple, Approach the boss, AoE adds. (It accumulates) |
| Verde, RED, Black | Eliminate Green, Approach the boss, AoE adds. (It accumulates) |
| Verde, Yellow, RED | Eliminate Green, Approach the boss, AOE healing. (It accumulates) |
| BLUE, Black, Yellow | Eliminate Yellow, main objective Mana void , AoE adds |
-
Tanks change after accumulating 3 stacking of the
Vacuum discharge
In case there is only one tank, it must be healed (spamheal) when more than 3 Dots are stacked. Healers should note that the Dot lasts for 10-15 seconds in the globule phase, more than 6 Dots could kill the tank. -
Thaumaturges must stay close, within 30 meters, where the Thaumaturges die. Mana Voids for
-
Using the RaidMarkers, the raid leader must coordinate which colors to kill quickly.
-
Apparently the boss has
{/ Tabs}
{showhide template = »h2, arrow-green» title = »Yorsahj the Unsleeping videos» open = false}
{tab = L2R}
{tab = MMO Champion}
{/ Tabs}{/ Tabs}
{/ showhide} {showhide template = »h2, arrow-green» title = »Achievements» open = false}
Pending
{/ showhide} {showhide template = »h2, arrow-green» title = »Yorsahj the Unsleeping Rewards» open = false}
Tier 13
| Object | Groove | Class |
|---|---|---|
| Leggings of the Corrupted Conqueror (LFR, Heroic) | Legs | Paladin, Priest, Sorcerer |
| Leggings of the Corrupted Protector (LFR, Heroic) | Legs | Guerrero, Hunter, Shaman |
| Leggings of the Corrupted Vanquisher (LFR, Heroic) | Legs | Rogue, Death Knight, Wizard, Druid |
Armor
| Object | Armor | Groove | Statistics |
|---|---|---|---|
| Interrogator's Bloody Footpads (LFR, Heroic) | Leather | Feet | Agility |
| Mind Trainer Treads (LFR, Heroic) | Mesh | Feet | Intellect / Spirit |
| Heartblood Wristplates (LFR, Heroic) | License plate | Dolls | Intellect / Spirit |
Weapons
| Object | Type | Statistics |
|---|---|---|
| Experimental Specimen Slicer (LFR, Heroic) | Ax 2M | Strength / Mastery |
| Spire of Coagulated Globules (LFR, Heroic) | Walking stick | Agility |
| Scalpel of Unrelenting Agony (LFR, Heroic) | Daga | Intellect / Spirit |
Rings and trinket
| Object | Type | Statistics / Effect |
|---|---|---|
| Signet of SutuRing (LFR, Heroic) | Ring | Intellect / Spirit |
| infinite loop (LFR, Heroic) | Ring | Intellect / Hit |
| Seal of Primordial Shadow (LFR, Heroic) | Ring | Agility |
| Breathstealer Band (LFR, Heroic) | Ring | Strength / Mastery |
| Hardheart Ring (LFR, Heroic) | Ring | Strength / Parry |
| Windward heart (LFR, Heroic) | trinket | Intellect / Extra Healing |
| Cunning of the Cruel (LFR, Heroic) | trinket | Intellect / Damage AOE |
| Badge of the Corrupted Mind (LFR, Heroic) | trinket | Intellect / Haste damage |
| Vial of Shadows (LFR, Heroic) | trinket | Agility / Extra Damage |
| Bone Link Fetish (LFR, Heroic) | trinket | Strength / Damage AOE |
| Indomitable Pride (LFR, Heroic) | trinket | Stamina / Shield |
| Soulshifter Vortex (LFR, Heroic) | trinket | Stamina / Mastery |
{/ showhide} {showhide template = »h2, arrow-green» title = »Yorsahj the Unsleeping images» open = false}

{/ showhide} {showhide template = »h2, arrow-green» title = »Quotes from Yorsahj the Watchman» open = false}
{tab = Spanish}
Threat
- Ilith qi'uothk shn'ma yeh'glu Shath'Yar! H'IWN IILTH!
- You will drown in the blood of the Old Gods! EVERYONE!
Call Blood of Shu'Ma
- KYTH ag'xig yyg'far IIQAATH ONGG!
- See how it springs up from the cursed earth!
Death
- Ez, Shuul'wah! Sk'woth'gl yu'gaz yog'ghyl ilfah!
- Oh, Deathwing !! Your faithful servant has failed you!
{tab = English}
aggro
- Ilith qi'uothk shn'ma yeh'glu Shath'Yar! H'IWN IILTH!
- You will drown in the blood of the Old Gods! ALL OF YOU!
Call Blood of Shu'Ma
- KYTH ag'xig yyg'far IIQAATH ONGG!
- SEE how we pour from the CURSED EARTH!
Death
- Ez, Shuul'wah! Sk'woth'gl yu'gaz yog'ghyl ilfah!
- Oh, Deathwing! Your faithful servant has failed you!
{/ Tabs}
{/ showhide}
Thanks to the database Wow head, Icy-Veins, L2R y MMO-Champion.