This article is mainly dedicated to healers, although any class can take advantage of the information to configure their addon. As you all know, the Grid is one of the most used addons for healing. It is highly configurable and customizable for each class / situation, so for me, it is the best I have tried so far.

The Grid is simply an add-on that shows us the members of the raid in squares, which we can configure in height, width, color, location. The usefulness of the Grid resides in that it can show a lot of information in these little squares or frames, in a more or less reduced space. And, most importantly, that each one decides the form and location of the information that each one wants to see.
Installation
Installs directly with the Curse Client or from the web pages curse.com o wowinterface.com.
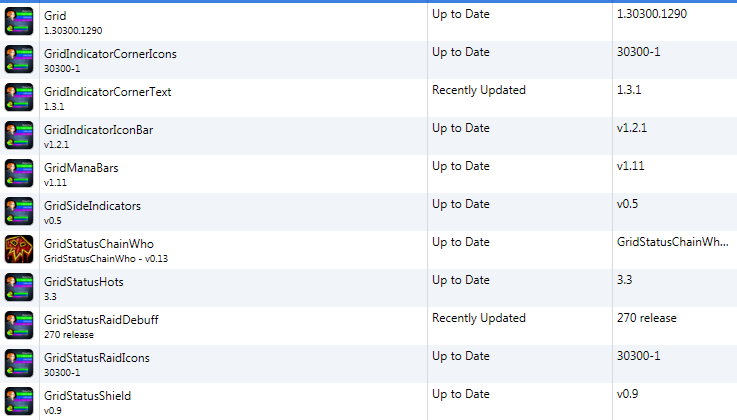
The most used and recommended healer plugins are the following:
- GridStatusRaidDebuff (Automatically adds raid / bosses debuffs, is a must)
- GridManaBars (adds a mana bar to the frame)
- GridStatusHots (to see the hots of all classes)
- GridStatusShield (for priests, to see how much absorb each shield has left)
- GridStatusChainWho (for shamans, to see who your Chains reach, although it also indicates for priests who your Circle of Healing and Sacred Nova reaches)
- GridStatusRaidIcons (to see the marks like skull, star ... in the frames)
- GridIndicatorIconBar (add icon indicators to frames)
- GridIndicatorCornerText (add text indicators in the corners of the frames)
- GridIndicatorCornerIcons (add icon indicators in the corners of the frames)
- GridIndicatorSideText (add text indicators on the sides of the frames)
- GridStatusTankCooldown (automatically adds the survival cd's of the different classes)
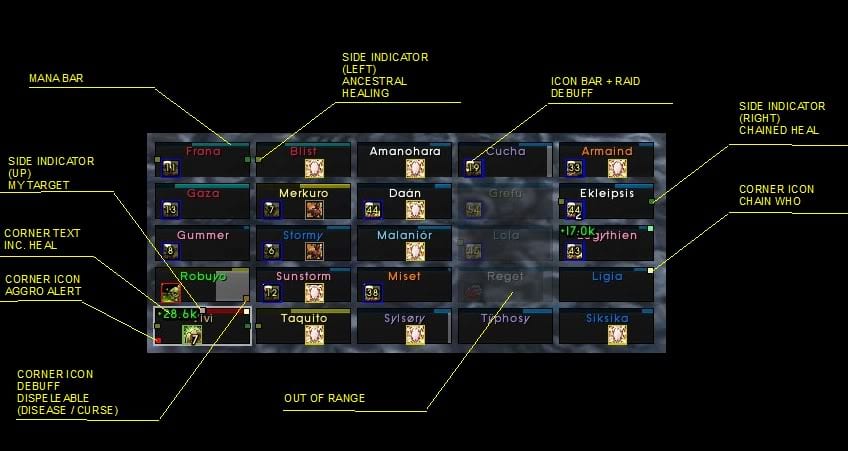
Here you can see a complete image.
There are many other plugins that can be adjusted more to what you need, it is just a matter of looking for them on the webs.
Grid operation
The basic functioning of the grid consists of the following: each frame has assigned spaces, modifiable, as if they were holes, in which we can assign certain information to be displayed. These spaces are the INDICATORS, which are of various types. The most used: text, icon, corner. The information that we can show in the icons is very varied, and is called AURAS (buffs and debuffs), although data such as who is offline or who has the agro can also be displayed. The basic process is to locate the Aura that we want to show in a check list that opens when selecting each Indicator, and select it. We have to bear in mind that we will have to choose the type of Aura suitable for each indicator (mainly text or icon).
The grid menu is opened with the command / grid config
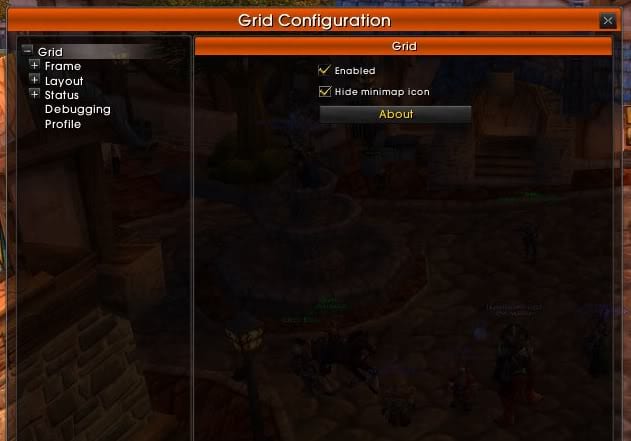
Within this menu we have the following options: FRAME, LAYOUTS, STATUS.
1. frame
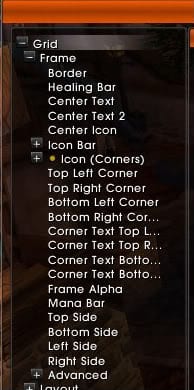
Here we can configure the different indicators of the frames. For example, if we click on the Center Icon indicator, a drop-down list opens with all the buffs / debuffs that we can assign to be displayed in that place. Since this indicator is icon-type, the spell's icon will be displayed.
Configuration options
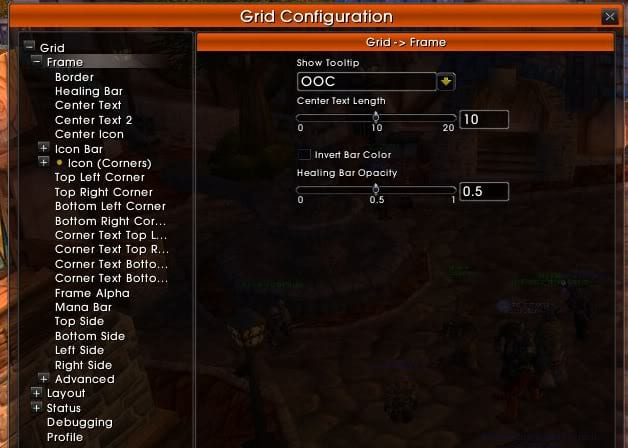
- Show Tooltip: Allows you to choose when we want the tooltip to be shown when hovering the mouse over the frames (in combat, out of combat, never)
- Center Text Length: Assigns the length of the text for the Center Text indicator. In this indicator, the name of each player usually goes, so if we indicate that the length is 4, we will only see 4 characters.
- Invert Bar Color: Used to invert the colors of the bars with the background; it can be useful at specific times.
- Healing Bar Opacity: Opacity of the bars (more or less transparency)
Indicators
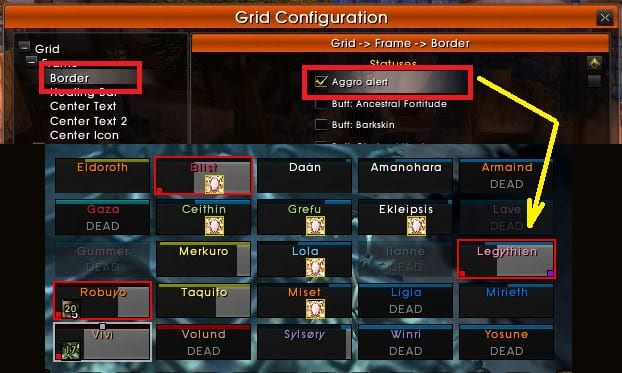
- Border: it is a box of more or less thickness around the frame that, like any other indicator, we can look for in the checklist on the right which aura we want it to show us. Personally, I have selected to tell me who my Target is. Another useful option is to check the Aggro box to check who has aggro at any given time.
- Health Bar Color: is generally used with the Range, so that the players who are outside your range come out semi-transparent.
- Center Text: text indicator that is in the center of the frame. It is usually used to place the names of the players.
- CenterText2: Add a text indicator in the center of the additional frame. It can be used for multiple tasks: indicate the incomingheal, indicate who is dead / in ghost, who is offline, who has done FD, indicate the missing life ...
- Center Icon: is a central icon in the center of the frame. If you have the GridIndicatorIconBar plugin you won't use it much.
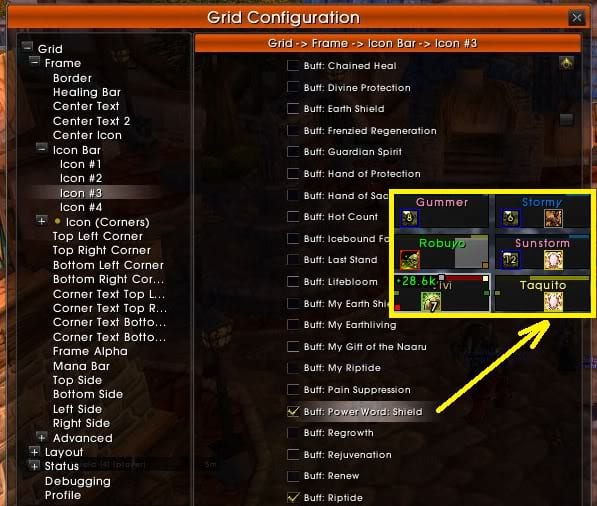
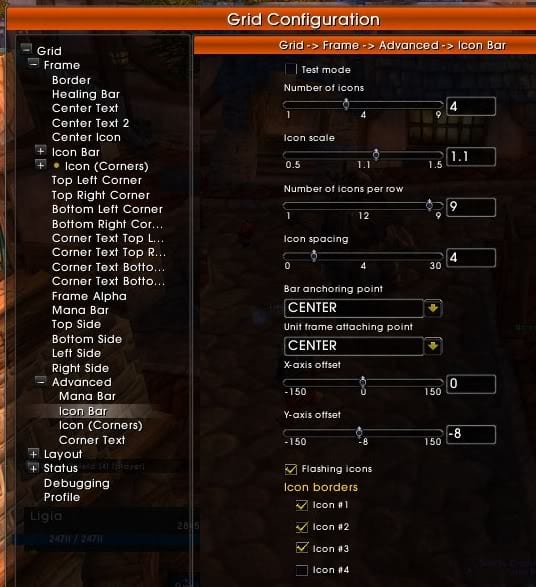
- IconBar: used to add more icons to your frame, allows up to 9. If we open the drop-down list, we can choose which aura we want to be shown in each of the icons. To configure options for this plugin, we have to go to Frame> Advanced> Icon bar, where it allows us to choose how many icons we want to see, their size, position ...
- Corners (Top, Bottom, Left, Right): These indicators are a small square in each of the corners. Its size is also configurable in Frame> Advanced. In my case, I use them to show the GridStatusChainWho, who has Aggro and who has a dispellable debuf (magic / poison / curse / disease, depending on each class), placing each one in a corner.
- Corner Text (Top, Bottom, Left, Right): Indicators for the corners that, in this case, display text. I use it to combine with GridStatusShield and GridStatusHots to see the information of my hots or shields in text form. To display information like GridStatusShield (absorb remaining of the shield) you must have a specific plugin that creates the corresponding Aura, or else the Text Indicator will simply name the aura. I also use it to watch the Incoming heal.
- Corner Icons: Add icons in the corners. Personally, I use it for the GridStatusRaidIcons and see who is flagged on raid (many raid addons use flagging on who gets some specific debuf)
- SideText: Add text on the sides of the frame; for example, incoming heals.
Advanced: advanced configuration options of the frames. It contains a menu from which we can change the size of Border, Corners, type of font, size of the same, texture of the bars ...

Specific plugin settings
- IconBar: Plugin configuration; size, number of icons, position, spacing ... Keep in mind that the Grid icons can show the remaining duration of the spell. If we want the duration to be seen in the form of a number, the size must be sufficient for the font.
- CornerText: Size, color ...
- mana bar: Height, location
- Font, Fontsize: Font type and size.
- Frame height, width, texture: Texture, width and height of each frame. The size should be enough to show all the information you want to see in an orderly way.
- Frame orientation: Allows you to choose if you want to see the life of the raid horizontally or vertically.
- Orientation of text: Text orientation.
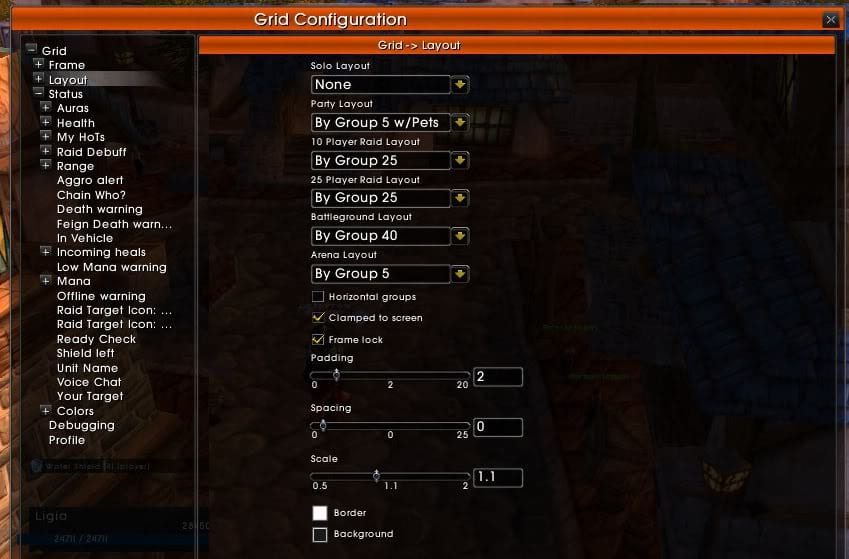
2. Layout
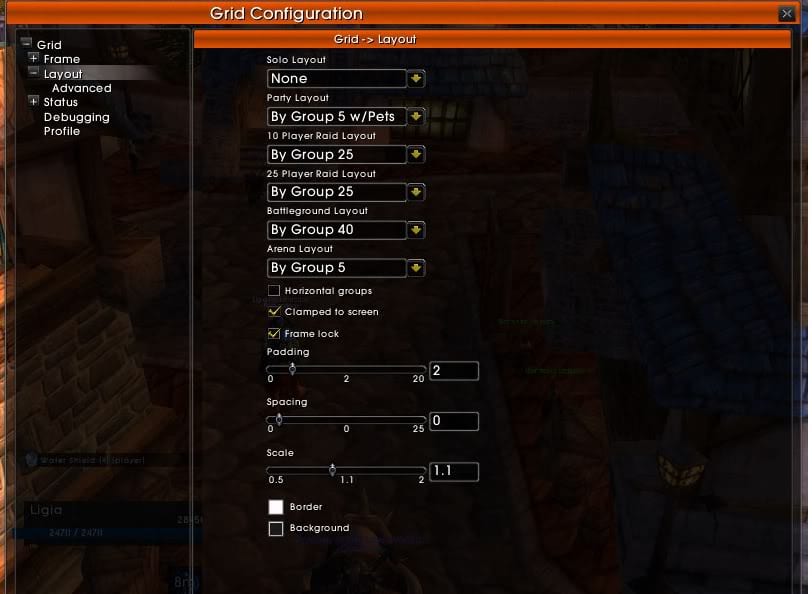
It allows you to configure the type of display of the Grid, depending on the type of raid / party we are in. We can configure for: solo, party, raid of 10, raid of 25, raid of 40, battleground, arena ... how many frames we want to see. That is, for a raid of 10 we will generally want to see the frames of the 10 players that are inside; if there is someone in group 3 waiting outside, it does not matter if they are visible. Therefore, we choose the display type "By Group 10" or "By Group 10 w / pets".
- Padding: Vertical movement between frames.
- Spacing: Horizontal movement between frames.
- Scale: Scale of the set.
- Border, background: Color of the border and background of the set (eye, not of each frame).
- Advanced
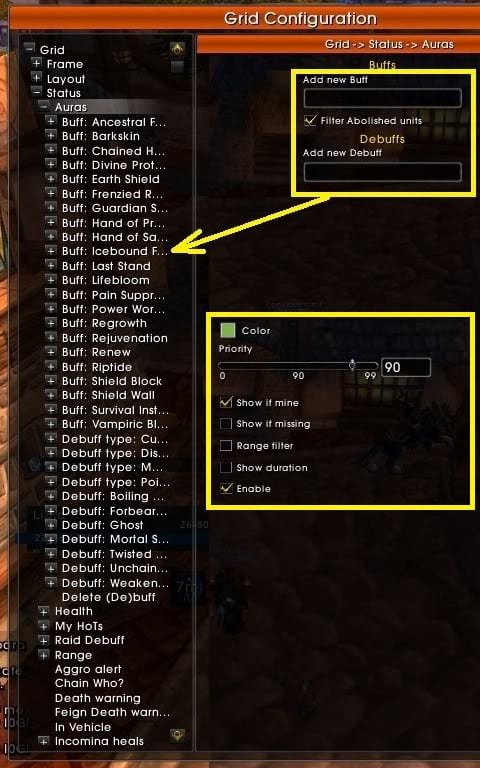
3. Status
It is the section in which we can configure, add or modify the information that will later be displayed in the indicators. In each of the Status we can choose its priority (if it is shown above or below others), the color, activate / deactivate it, filter by class ...
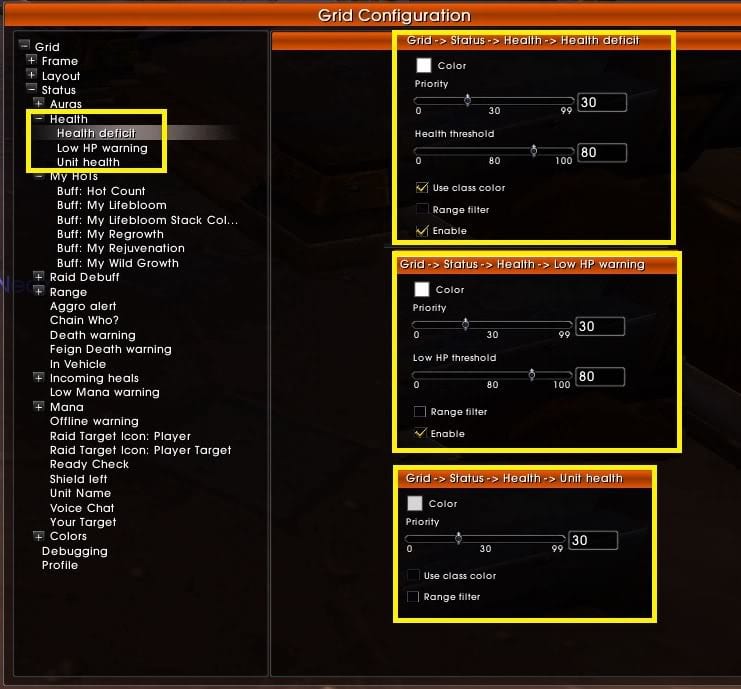
Health: allows you to configure how we want to see the life deficit, if we want it to warn us in some way when someone has less than a certain percentage of life or the color of the life of each unit.
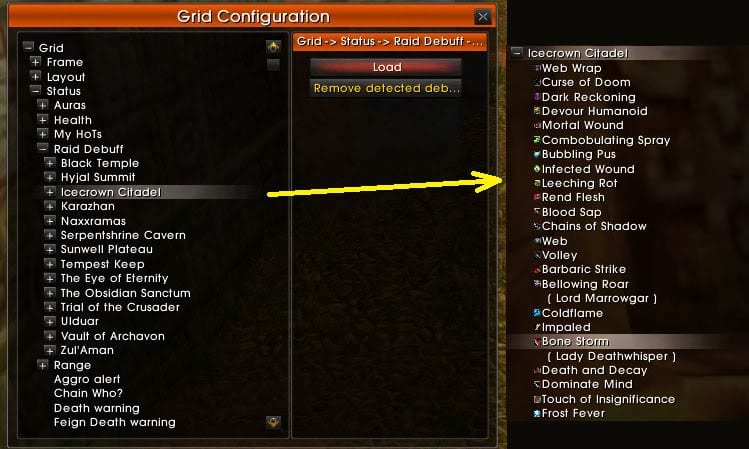
Raid debuff: It is a plugin that automatically adds the debuffs of the bosses of each raid, without having to add them manually. Each of them can be configured individually, for example if we want one not to appear or if we want to highlight it above others.
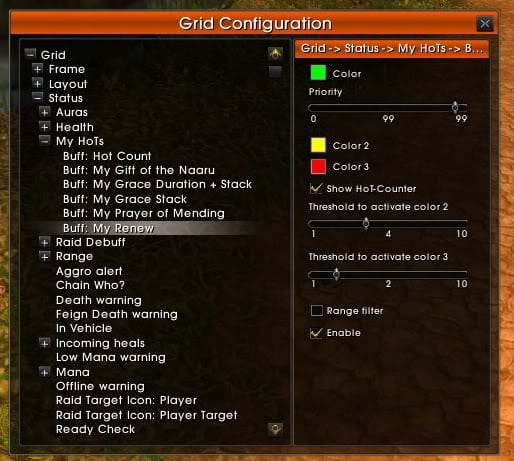
MyHots: Track healings over time for any class. If we use this aura in the indicators, we must bear in mind that it is of the text type, so it allows us to see the duration in a Corner Text, for example. For each class, it allows you to track its different hots, so each one will have a different menu that will be configured in a similar way. It is possible to assign different colors according to the duration of the Hot in question and there is also the possibility of activating a “Hots Counter” to know how many each member of the raid has (whether they are ours or not).
- Range: Shows the players who are out of semi-transparent range, being possible to change said transparency according to the ranges,
- aggro alert: Indicates who has agro, generally with a red color.
- Death warning: Displays the text DEATH in those who have died.
- Feign death warning: Indicate with DF the hunters who have made feign death.
- InVehicle: Change the frames when a player is on a vehicle.
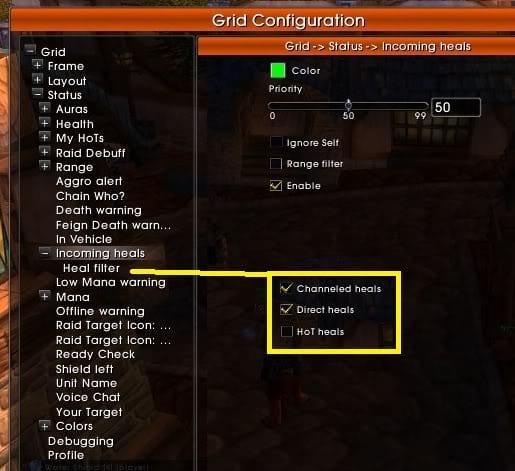
- Incoming heals: Frame addons are usually synchronized so that the entire raid can see how many heals are being cast on each player.
- Raid Target Icon (player and target): Shows the raid brand (star, skull ...) that each player has and / or the one that each player cards.
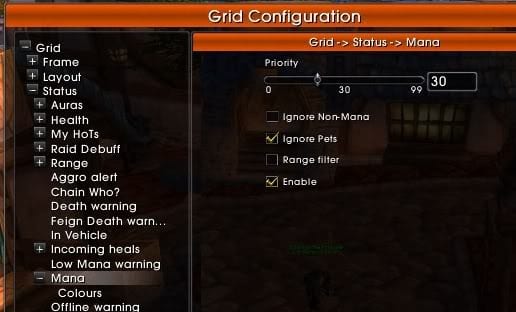
- Low Mana Warning: Used to highlight who has low mana.
- What: Bar color (also shows energy, rage or runic power of other classes)
- OfflineWarning: Displays the text OFFLINE on who it is.
- Ready check: If you have been promoted to see it, indicate who has accepted or rejected the Ready.
- UnitName: Displays the name of each player as text.
- Your Target: To show who your target is.
When viewing any of these statuses, you simply choose the indicator where you want it to be displayed and activate it in the check list on the right.
PROFILE
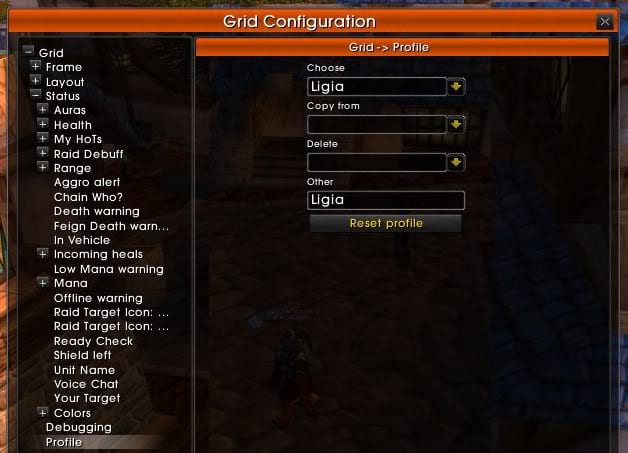
Finally, the Grid allows us to create different profiles for our different characters, since each of them will want to see different information in the frames. For this we have the Profile section, in which we will create a new profile, from scratch or copying it from an existing one to modify it.
EXAMPLE
Download links for the addon?
https://wow.curseforge.com/projects/grid
I am a restoration druid and I see the healing buffs of other druids in the rest of the raid, how can I configure it to only see my healings to the raid?
You have to select each skill in status and check the option "show mine only" so that it does not show you all the same skills at the same time.